Baking and cooking my way through the cold Alaska winters keeps me from getting cabin fever. With the help of my husband and our three dogs, we manage to maintain our sanity through adventures in our kitchen and our hometown, Fairbanks.
Wednesday, November 23, 2011
Cranberry Salad and Cold Weather
Fairbanks is breaking all kinds of cold weather records this month. Lucky us! Good thing we have the beginning of the holiday season to keep our minds busy and our spirits bright. One of the things I really look forward to is my mother Ruth's cranberry salad. She always made it for Thanksgiving. I make it all year, or most of the year. I make it over and over in November and December for the holidays. I make it in January for my birthday and then in February because it is so pretty for Valentine's day. By then, I'm a little tired of it because I'm the only one in my house that will eat cranberries, I'll make it one more time in July and then I forget about it until next Thanksgiving.
The basic recipe comes from The Joy of Cooking by Irma Rombauer. Not the updated version of the book, but the 1931 original version. It is a tart, crunchy salad that puts that canned cranberry stuff to shame. I hope you enjoy it as much as I do, but don't expect me to share mine.
Cranberry Salad
1 20oz. can crushed pineapple, drained and juice reserved
1 Tbsp. (or envelope) plain gelatin
3 Tbsp. water
2 cups cranberries
1/2 cup sugar (less or more to taste)
1/4 tsp. salt
2/3 cup diced celery
1/2 cup chopped walnuts
Drain pineapple, reserving the juice. Bloom gelatin in 3 Tbsp. water. Cook cranberries in reserved pineapple juice with water added (if needed) to equal 1 cup. Cook until the skins pop. Add sugar and cook for 5 more minutes, mixture will become syrupy. Remove from heat and add salt and gelatin. Stir until gelatin is completely melted and mixed. Let cranberry mixture cool about 20 minutes. Add celery, walnuts and drained pineapple. Refrigerate.
What is your favorite Thanksgiving dish?
November 23, 2011 Daylight 5 hours, 29 minutes, 54 seconds Current Temp. 2 ºF
Sunday, November 20, 2011
Caramel Sauce and Hockey
We have season tickets to University of Alaska, Fairbanks (UAF) hockey. My husband, my brother- -in-law and I go to every game when the Nanooks are in town. The Nanooks are a Division 1 hockey team and started the preseason year ranked 13th in the nation. "Nanook" is Inuit Eskimo for Polar Bear.
We sit right behind the side with the net. You sit with the same people every game, my husband has known most of them all his life. It's fun to catch up with what everyone is doing. Sam's son is playing football now (where did the time go?) and knows all the stats for all the hockey players, Margaret and Ed are headed to Arizona (lucky ducks) and the Roger's family is settled in for the winter, they are at every game with their UAF hockey jersey's on, yelling at the refs when they don't call a play right.
I enjoy the fast pace of the games, but I love the food available at the game. No overcooked hotdogs for me (although you can get them there), no I go for the specialty ice cream sundaes, the spicy barbeque, the fresh fruit smoothies or the caramel apples.
The Fudge Pot has a booth at every game. They sell all kinds of flavors of fudge (cranberry anyone?) and they sell caramel apples.
You can get them two ways. A regular dipped apple, plain or rolled in candy or nuts or, my favorite way, sliced with a soft, creamy caramel poured over the slices, again plain or topped with candy or nuts. I love mine plain. The caramel is warm, creamy and puddles at the bottom of the paper container. The last bites of apple are used to scrape up the caramel stuck to the bottom. They bring out the kid in you, without the sticky caramel all over your cheeks. The caramel apples will set you back $5, but trust me they are worth it once in a while. It got me to thinking about how easy caramel is to make at home and how delicious it would be to pour some warm, creamy caramel over our apple pie this Thanksgiving.
I'm big into practicing before I serve something new to people, and even though I'm pretty capable at apple pie and caramel separately, I had to practice them together before the big day. (Once I practiced wellington so many times, my husband asked for a break from meat! He only eats meat!) So, it was a cold weekend, and I practiced.
Creamy Caramel Sauce
Adapted from; Gifts from the Christmas Kitchen, 1998, Publications International, Ltd.
1 cup granulated sugar
1 cup heavy cream
1/2 cup packed light brown sugar
1/3 cup corn syrup
1 teaspoon vanilla extract
extra heavy cream to thin (optional)
Place both sugars, cream and corn syrup in a medium saucepan. Stir over low heat until mixture boils. Carefully clip candy thermometer to side of pan. (Make sure bulb is not touching bottom of pan). Cook, stirring occasionally, about 20 minutes or until thermometer registers 238ºF. Immediately remove from heat. Stir in vanilla. Cool about 15 minutes. Check consistency of sauce and thin with extra cream is desired. Serve warm or pour into clean glass jars and seal tightly. Store up to 6 months in refrigerator. Reheat sauce over low heat before serving. Makes about 2 cups.
November 20, 2011 Current Daylight 5Hrs, 48 Min, 30 Sec. Current Temp. -28º F
Thursday, November 17, 2011
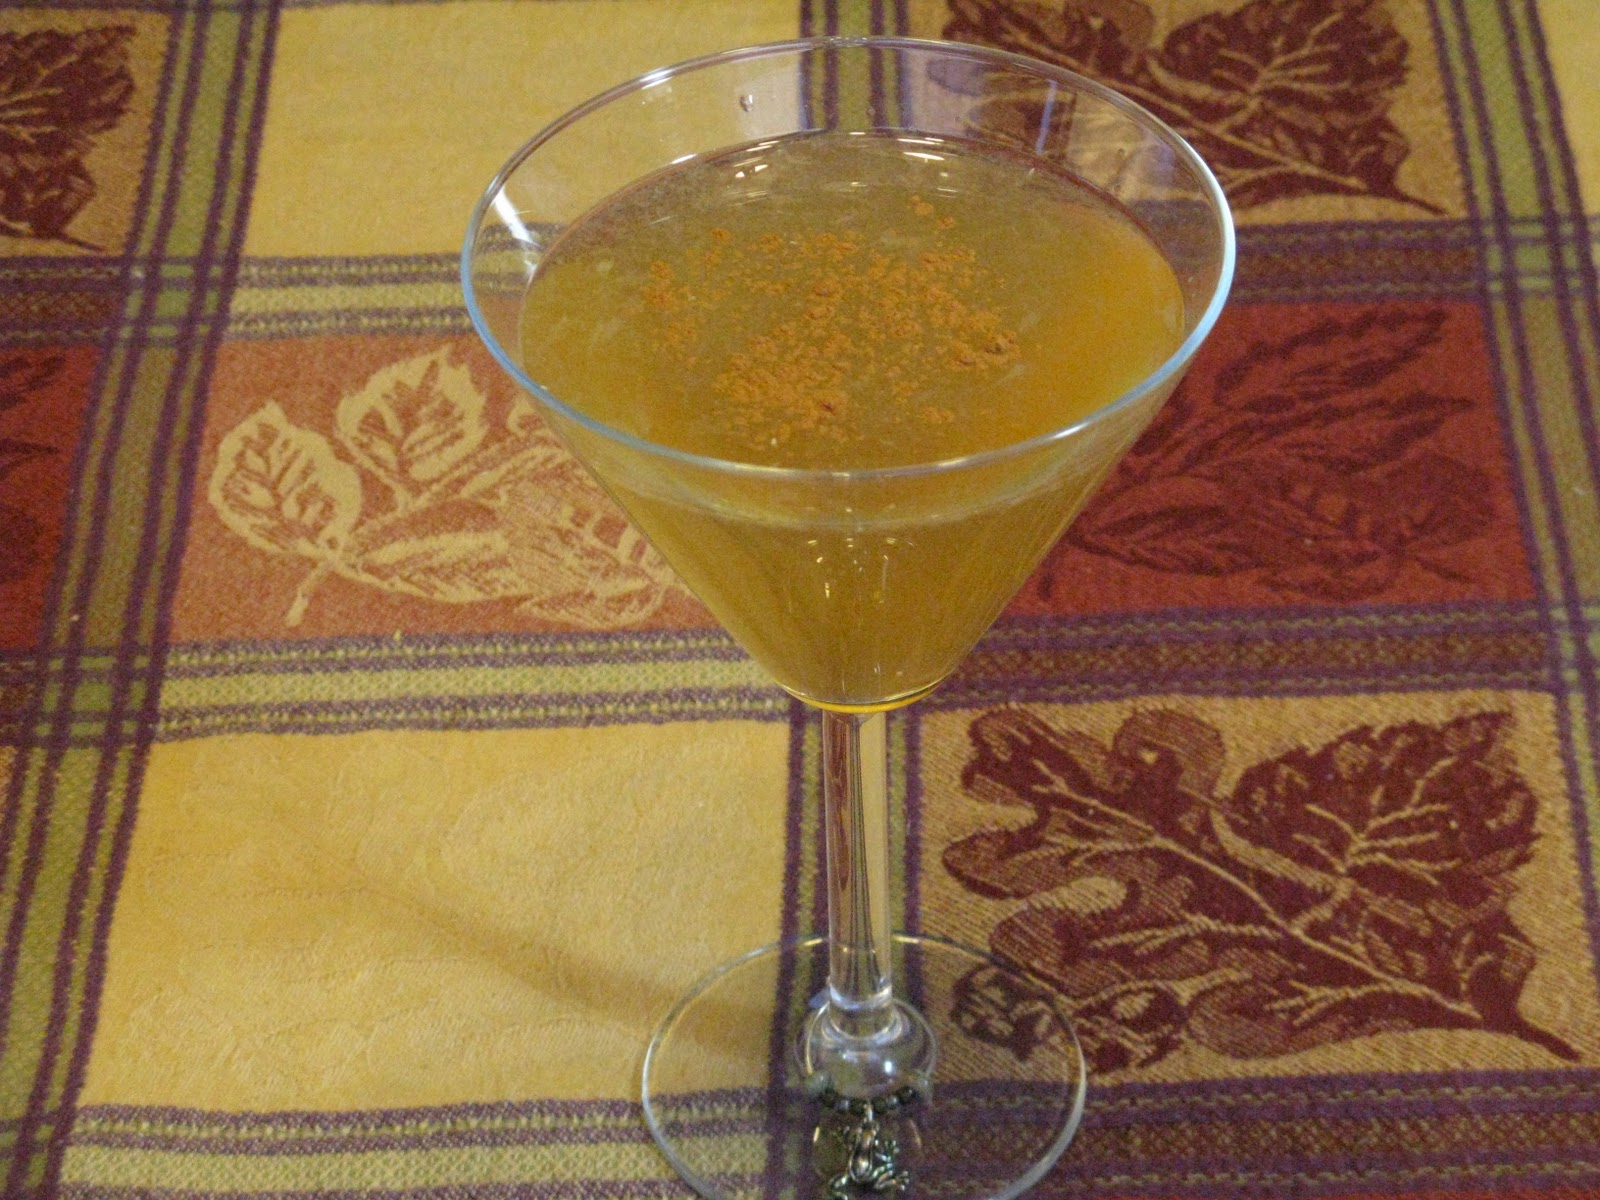
Hard Spiced Apple Cider
O.K., back by popular demand...(drum roll please) The Drink of the Week! I used to post this on my facebook page, but with all their "improvements" there really wasn't a good spot for it. Now that we are closer to the holiday season I'm getting requests to re-institute the drink of the week. So, here we go. I'll post next week's drink on Thursday or Friday so you have the weekend to get supplies and practice. If you sign up for emails from this site, they will automatically come to your email box and you will be set!
This week, with Thanksgiving and all the family and friends that you we will be entertaining, I chose a crisp fall drink that is light and easy to prepare in single drinks or in larger batches. I've given amounts for a single serving and for 4 servings. You can multiply as you need for the occasion.
Hard Spiced Apple Cider
Single drink:
1.5 oz spiced rum (I use Captain Morgan special reserve)
4 oz. apple cider (I used the sparkling kind, it is a holiday after all and I love bubbles)
1/2 oz simple syrup
1/2 Tbsp. lime juice
cinnamon or cinnamon-sugar for garnish
Fill shaker with ice, add all ingredients except cinnamon, shake (or stir if sparkling apple cider), strain into martini glass, top with a sprinkling of cinnamon. (Optional, rub rim of glass with damp, clean sponge, dip rim in cinnamon sugar mixture.
Pitcher for four drinks:
6 oz. spiced rum
2 cups apple cider
2 oz. simple syrup
2 Tbsp. lime juice (or more, to taste)
cinnamon or cinnamon-sugar for garnish
Mix all ingredients except cinnamon in a pitcher of ice, stir until very cold, pour into martini glasses. Garnish with cinnamon or dip rims as suggested above.
November 17, 2011 Daylight 6 hours, 7 minutes, 37 seconds Current Temperature -39º F
Tuesday, November 15, 2011
Molasses Spice Cookies
It is really starting to get cold, -35º F (below zero) is expected by Wednesday, and it is getting close to the holidays so those two things always turn my thoughts to cookies. My grandma Stejer was a big baker, she sent boxes of cookies to us for years. I even have pictures of one of my sons (now 23) eating Grandma's cookies in his blue footie pajamas when he was 2. I love the memory of someone caring for us so much, they went to the trouble of baking and sending cookies so we could enjoy them. I hope I do that enough for my boys.
I loved the sugar cookies with the frosting, nothing is too sweet for me! Grandma always sent these molasses cookies and I always turned my nose up to them. Give me chocolate chip, sugar cookies or those balls of cookies coated in powdered sugar. YUM!
Luckily, I grew up (in spite of all the sugar) and so did my taste buds. Now don't get me wrong, if you want to send me a box of frosted sugar cookies or chocolate chip, I'll happily take care of them for you, but now I do love a spicy molasses cookie. Just the smell of them in my house reminds me of my Grandma and all the warm feelings of the holidays.
These molasses cookies are especially good. The spiciness of the ginger, cinnamon and cloves gives the whole house a wonderful aroma when they bake. I make them with a #40 scoop and they are big enough that one will be enough, but not too big that you can't manage two. They are crispy on the edges and chewy in the centers. A perfect cookie to start the cookie season off to a spicy start.
My Grandma would be proud.
Molasses Spice Cookies
adapted from Perfect Cookies 2008, Fog City Press
1/2 cup vegetable shortening
1/4 cup unsalted butter, room temp.
1 cup firmly packed dark brown sugar
1 large egg
1/4 cup molasses
2 tsp. orange zest
2 cups all-purpose flour
2 tsp. baking soda
2 tsp. ground giner
1 1/2 tsp. ground cinnamon
1 tsp ground cloves
1 tsp. salt
sugar for coating
In a large bowl, combine the shortening, butter and brown sugar. Using an electric mixer on high speed, beat until the mixture is light and fluffy. Add the egg, molasses and orange zest and beat until blended.
In another bowl, sift together the flour, baking soda, ginder, cinnamon, cloves and salt. Gradually add the flour mixture to the shortening mixture and mix on low speed just until blended. Cover and refrigeratie the dough until it is firm, at last 1 hour or up to overnight.
Preheat the oven to 350º F. Lightly grease 2 cookie sheets. Pour some sugar for coating into a shallow bowl.
With dampened hands, shape the dough into 1 1/4 inch balls; you should have about 30 balls. Roll each ball in sugar to coat evenly. Arrange the sugar-coated balls on the prepared cookie sheets, spacing them about 2 inches apart.
Bake until the cookies are pale golden and cracked on top, about 12 minutes; the cookies will still be soft. Let the cookies cool on the cookie sheets on wire racks for about 1 minute. Use a spatula to transfer the cookies to the wire racks to cool completely. Store in an airtight container at room temperature for up to 1 week.
November 15, 2011 Daylight 6 hours, 20minutes, 33 seconds Current temperature -28º F
Sunday, November 13, 2011
Baked Shrimp with Tomatoes and Feta
One of the joys of frozen roasted tomatoes and garlic is how easy this dish becomes. It is warm, satisfying and quick. You can make it with canned tomatoes, and once my roasted tomatoes from my green house are gone that is what I'll do, but there is something very satisfying to me to pull together a meal with products we grew, caught or hunted ourselves.
This recipe comes from Ellie Krieger's The Food You Crave, I don't think we have tried anything from that book we didn't like. I like to serve it with brown rice and a crusty baguette, hot from the oven. It is truly comfort food at it's finest.
Baked Shrimp with Tomatoes and Feta
adapted from Ellie Krieger The Food You Crave
Ingredients
- 1 tablespoon olive oil
- 1 medium onion, diced (about 1 1/2 cups)
- One 28 oz. container of roasted tomatoes and garlic (you can substitute 2 14.5 oz cans diced tomatoes and 2 cloves of garlic minced)
- 1/4 cup finely minced fresh flat leaf parsley
- 1 1/4 pounds medium shrimp, peeled and de-veined
- 1/4 teaspoon salt
- 1/4 teaspoon freshly ground black pepper
- 2/3 cup crumbled feta cheese (about 3 ounces)
Directions
Preheat the oven to 425 degrees F.
Heat the oil in an oven proof skillet over a medium-high heat. Add the onion and cook, stirring, until softened, about 3 minutes. Add the roasted tomatoes and garlic and bring to a boil. Reduce the heat to medium-low and let simmer for about 5 minutes, until the tomato juices thicken.
Remove from the heat. Stir in the shrimp and season with salt and pepper. Sprinkle the feta over the top. Bake until the shrimp are cooked through and cheese melts, about 12 minutes. Top with parsley and serve with brown rice or orzo.
November 12, 2011 Daylight 6 hours, 33 minutes, 39seconds Current Temp. 7º F
Saturday, November 12, 2011
Carrot, Apple and Mint Salad
Our building does a soup lunch once a week. Different people are assigned to bring soup each week and we all enjoy a warm lunch, some socializing, and a new soup. We each bring soup two times during 6 months and we have soup lunch once a week for most of the winter. The suite that my office is in is bringing soup and I am bringing some support, in the form of carrot, apple and mint salad. This recipe comes from Ellie Krieger's book, The Food You Crave. It is a deliciously sweet, crunchy and tart salad that really satisfies.
I used carrots from our garden and shredded them with the food processor. Don't be tempted to make this with pre-shredded carrots, they are dry and tasteless. If you don't have a food processor it is really worth the trouble of grating them yourself. Also, be sure to keep the peel on your apple, the color is beautiful.
Carrot, Apple and Mint Salad
Ellie Krieger, The Food You Crave
Ingredients
- 1/3 cup plain nonfat yogurt
- 2 tablespoons mayonnaise
- 1 tablespoon lemon juice
- 1 tablespoon cider vinegar
- 1 teaspoon honey
- 1 pound carrots, peeled and trimmed
- 1 Granny Smith apple, cored
- 2 tablespoons roughly chopped fresh mint leaves
- Salt
Directions
Fold a full sheet of paper towel into quarters and place it in a small bowl. Spoon the yogurt on top of the paper towel. Place it in the refrigerator for 20 minutes so the yogurt can drain and thicken.
In a small bowl whisk together the thickened yogurt and the mayonnaise, until smooth. Whisk in the lemon juice, vinegar, and honey.Grate first the carrots and then the apples in a food processor. Transfer them to a large bowl and stir to combine. Pour the dressing over the carrot mixture and toss. Add the mint and season with salt.
Serve chilled.
November 12, 2011 Daylight 6 hours, 40 min., 14 sec. Current Temp. 9º F
Thursday, November 10, 2011
Whole Wheat, Millet and Dried Fruit Bread
I
love bread. I love mixing it, kneading it, baking it, smelling it and
eating it. Again, I love bread. This is one of my favorite breads.
It comes from the book Healthy Bread in Five Minutes a Day by
Jeff Hertzberg, M.D. and Zoe Francois (2009). I love the book, but I
do want to say there is nothing 5 minutes a day about it. Their idea
is that it takes 5 minutes of active time, however, don't think
you can get home from work, spend 5 minutes and have it in and out of
the oven in time for dinner. It takes a good 90 minutes to rise and
then 40 minutes to bake, that is after you've mixed it and let it rise
for 2 hours and sit in the fridge for 24 hours.
Now, don't let my rambling scare you off from this recipe. It is great to put together on a Saturday and then bake on Sunday, and Monday, and Tuesday, and Wednesday. It makes 4 loaves ( I usually bake two at a time). You can half the recipe, but trust me you will want all four. The idea is you mix together a batch of dough and it lasts in the fridge for 7 days, and some recipes in the book up to 2 weeks.
This loaf is a dense whole wheat loaf with millet and dried fruit. I change up the dried fruit depending on what I have in my pantry and that depends on what is on sale. I love this toasted and a smear of cream cheese sends it over the top. Did I say this was so good?
The directions are long, but really it doesn't take that much time to put together, the long part is giving it the time to raise.
Toasted Millet and Fruit Bread:
adapted from Healthy Bread in Five Minutes a Day, Jeff Hertzberg, M.D. and Zoe Francois (2009)
Makes enough dough for at least five 1-pound loaves. This recipe is easily doubled or halved.
1 cup millet
4 cups whole wheat flour
2 cups unbleached all-purpose flour
1/2 cup brown sugar
1 1/2 Tbsp. granulated yeast, or 2 packets
1 1/2 Tbsp. kosher salt
1/4 cup vital wheat gluten
3 3/4 cups lukewarm water
3 cups mixed dried fruit (I used cranberries, cherries, apricots, and dates)
1. Mixing and storing the dough: Before mixing, toast the millet in a dry skillet over medium heat, stirring and shaking constantly until it turns golden brown. Whisk together millet, flours, brown sugar, yeast, salt and vital wheat gluten in a 5 quart bowl, or a lidded (not airtight) food container.
2. Add the water and fruit and mix without kneading, using a spoon, a 14 cup food processor (with dough attachment), or heavy-duty stand mixer (with paddle). You might need to use wet hands to get the last bit of flour to incorporate if you're not using a machine.
3. Cover (not airtight), and allow the dough to rest at room temperature until it rises and collapses (or flattens on top), approximately 2 hours.
4. The dough must be refrigerated for at least 24 hours before use. Refrigerate it in a lidded (not airtight) container and use over the next 7 days.
5. On baking day, dust the surface of the refrigerated dough with flower and cut off a 1-pound (grapefruit size) piece. Dust with more flour and quickly shape it into a ball by stretching the surface of the dough around to the bottom on all four sides, rotating the ball a quarte-turn as you go. Because of the millet and drid fruit the loaf will never be perfectly smooth.
6. Elongate the ball into a narrow oval. Allow the loaf to rest, loosely covered with plastic wrap, on a pizza peel prepared with flour or lined with parchment paper for 90 minutes. I use a non sided cookie sheet sprinkled with corn meal to aid in sliding.
7. Thirty minutes before baking time, preheat oven to 375 degrees F. with a baking stone placed on the middle rack. Place an empty metal broiler tray on any other rack that won't interfere with the rising bread.
8. Just before baking, use a pasty brush to paint the top with water. Slash the top with 1/4 inch deep parallel cuts, using a serrated bread knife.
9. Slide the loaf directly onto the hot stone (or slide the parchment paper and dough onto the stone). Pour 1 cup hot tap water into the broiler tray and quickly close the oven door. Bake about 40 minutes until richly browned and firm. If you use parchment paper, you want to peel it off about 2/3 of the way through baking.
10. Allow to cool before slicing, if you can. I always mangle the first loaf because I can't wait for it to cool enough.
This book and the first book by these two authors are great books if you like bread. There is a recipe for a pumpkin pie brioche that I make for Thanksgiving dinner, and a whole wheat baguette we eat almost every week. I have both books and use them about once a week.
November 10 Daylight 6 hours, 53minutes, 29seconds current temp. 18ºF
Now, don't let my rambling scare you off from this recipe. It is great to put together on a Saturday and then bake on Sunday, and Monday, and Tuesday, and Wednesday. It makes 4 loaves ( I usually bake two at a time). You can half the recipe, but trust me you will want all four. The idea is you mix together a batch of dough and it lasts in the fridge for 7 days, and some recipes in the book up to 2 weeks.
This loaf is a dense whole wheat loaf with millet and dried fruit. I change up the dried fruit depending on what I have in my pantry and that depends on what is on sale. I love this toasted and a smear of cream cheese sends it over the top. Did I say this was so good?
The directions are long, but really it doesn't take that much time to put together, the long part is giving it the time to raise.
Toasted Millet and Fruit Bread:
adapted from Healthy Bread in Five Minutes a Day, Jeff Hertzberg, M.D. and Zoe Francois (2009)
Makes enough dough for at least five 1-pound loaves. This recipe is easily doubled or halved.
1 cup millet
4 cups whole wheat flour
2 cups unbleached all-purpose flour
1/2 cup brown sugar
1 1/2 Tbsp. granulated yeast, or 2 packets
1 1/2 Tbsp. kosher salt
1/4 cup vital wheat gluten
3 3/4 cups lukewarm water
3 cups mixed dried fruit (I used cranberries, cherries, apricots, and dates)
1. Mixing and storing the dough: Before mixing, toast the millet in a dry skillet over medium heat, stirring and shaking constantly until it turns golden brown. Whisk together millet, flours, brown sugar, yeast, salt and vital wheat gluten in a 5 quart bowl, or a lidded (not airtight) food container.
2. Add the water and fruit and mix without kneading, using a spoon, a 14 cup food processor (with dough attachment), or heavy-duty stand mixer (with paddle). You might need to use wet hands to get the last bit of flour to incorporate if you're not using a machine.
3. Cover (not airtight), and allow the dough to rest at room temperature until it rises and collapses (or flattens on top), approximately 2 hours.
4. The dough must be refrigerated for at least 24 hours before use. Refrigerate it in a lidded (not airtight) container and use over the next 7 days.
5. On baking day, dust the surface of the refrigerated dough with flower and cut off a 1-pound (grapefruit size) piece. Dust with more flour and quickly shape it into a ball by stretching the surface of the dough around to the bottom on all four sides, rotating the ball a quarte-turn as you go. Because of the millet and drid fruit the loaf will never be perfectly smooth.
6. Elongate the ball into a narrow oval. Allow the loaf to rest, loosely covered with plastic wrap, on a pizza peel prepared with flour or lined with parchment paper for 90 minutes. I use a non sided cookie sheet sprinkled with corn meal to aid in sliding.
7. Thirty minutes before baking time, preheat oven to 375 degrees F. with a baking stone placed on the middle rack. Place an empty metal broiler tray on any other rack that won't interfere with the rising bread.
8. Just before baking, use a pasty brush to paint the top with water. Slash the top with 1/4 inch deep parallel cuts, using a serrated bread knife.
9. Slide the loaf directly onto the hot stone (or slide the parchment paper and dough onto the stone). Pour 1 cup hot tap water into the broiler tray and quickly close the oven door. Bake about 40 minutes until richly browned and firm. If you use parchment paper, you want to peel it off about 2/3 of the way through baking.
10. Allow to cool before slicing, if you can. I always mangle the first loaf because I can't wait for it to cool enough.
This book and the first book by these two authors are great books if you like bread. There is a recipe for a pumpkin pie brioche that I make for Thanksgiving dinner, and a whole wheat baguette we eat almost every week. I have both books and use them about once a week.
November 10 Daylight 6 hours, 53minutes, 29seconds current temp. 18ºF
Wednesday, November 9, 2011
New Wood Stove
Well, this stove was in the house when we moved in, we used it for 10 years and then it was time to replace it. We purchased one of those energy efficient models that got us a tax break, is better for the air, and keeps us toasty on less wood. It was a job to change out the stove.
We unhooked the stovepipe and took the top soapstone tiles off, then moved the old stove. It took 3 men to move it and even then there were a lot of groans and complaints.
We cleaned up the area and got everything ready for the new stove.
We moved the new stove into it's place, again, 3 men, lots of groaning and complaining. It is cast iron and extremely heavy.
So the new stove is in, it is nice and warm, just in time for the colder month coming and a table next to it makes a nice place to raise bread!
November 9, 2011 Daylight 7 hrs., 0 min., 9 sec. Current temp. 10º F.
Subscribe to:
Posts (Atom)