Friday, August 30, 2019

The New Family Member and Keto Fried Cheese Sticks


We have a new family member I'd like to introduce you to.  He is rather quiet and really low maintenance and we have named him Charles.  Dave wanted to name him Charlie but that was not dignified enough for him, so Charles it is.

It all started when we were at the greenhouse picking up flowers for the garden.  I mentioned I wanted a new flowering tree to take the place of the chokecherry we had to cut down last summer.  Our front yard is just grass now and I miss the spring blossoms.  I walked over and looked at the flowering crab apples and decided I wanted one.  Well, we were out of room in the truck and the tree was $150, so I figured I could think about it for a while.

That Saturday, I met a friend for coffee and she mentioned the Conservation tree sale that was going on that day.  We headed over there to see if they had a flowering crab apple for me.  We stood in line for a good 20 minutes (we were a little early and the line was already 20 people deep).  I figured with so many people there it must be a really good tree sale, and it was!  My flowering crab apple cost me $5!  Yes, only $5.  Dave would be so proud of me for saving him so much money.

Well, it was my turn and I asked for my tree and out came my 5 inch stick with a whole bunch of roots.  Yes, 5 inches and not a single leaf on it.  I looked at that little stick and just laughed.  My friend gave me planting advice and off I went home to plant my little tree.

Dave came home and asked me why I stuck a dead stick in the middle of the front lawn.  I told him how much money I saved him and he just laughed.  He said it looked worse than Charlie Brown's Christmas tree and we should name him Charlie.  But I knew great things were in store for this little stick and named him Charles, a distinguished  name for a (soon to be) distinguished tree.

Charles has been in the ground all summer now.  He has grown some leaves and looks to be thriving.  I talk to him everyday when I water and tell him "good morning, have a good day" every morning when I get in my car to go to work.  Charles is off to great things.
Charles with Gman and the Seatlle DIL the first week of July.

To celebrate the beautiful leaves Charles has grown, I made keto cheese sticks.  I love those fried mozzarella sticks most restaurants have on their appetizer menu.  I made my keto friendly and safe for my tummy.  I made a big batch and keep them in the freezer so I can pull out a couple and have an appetizer any time I want.  They work equally well in the air fryer or fried in hot oil.
Cooking in the airfryer makes them leak a little.

Here's to you Charles, keep growing those leaves and I'll eat my fried cheese sticks and watch!

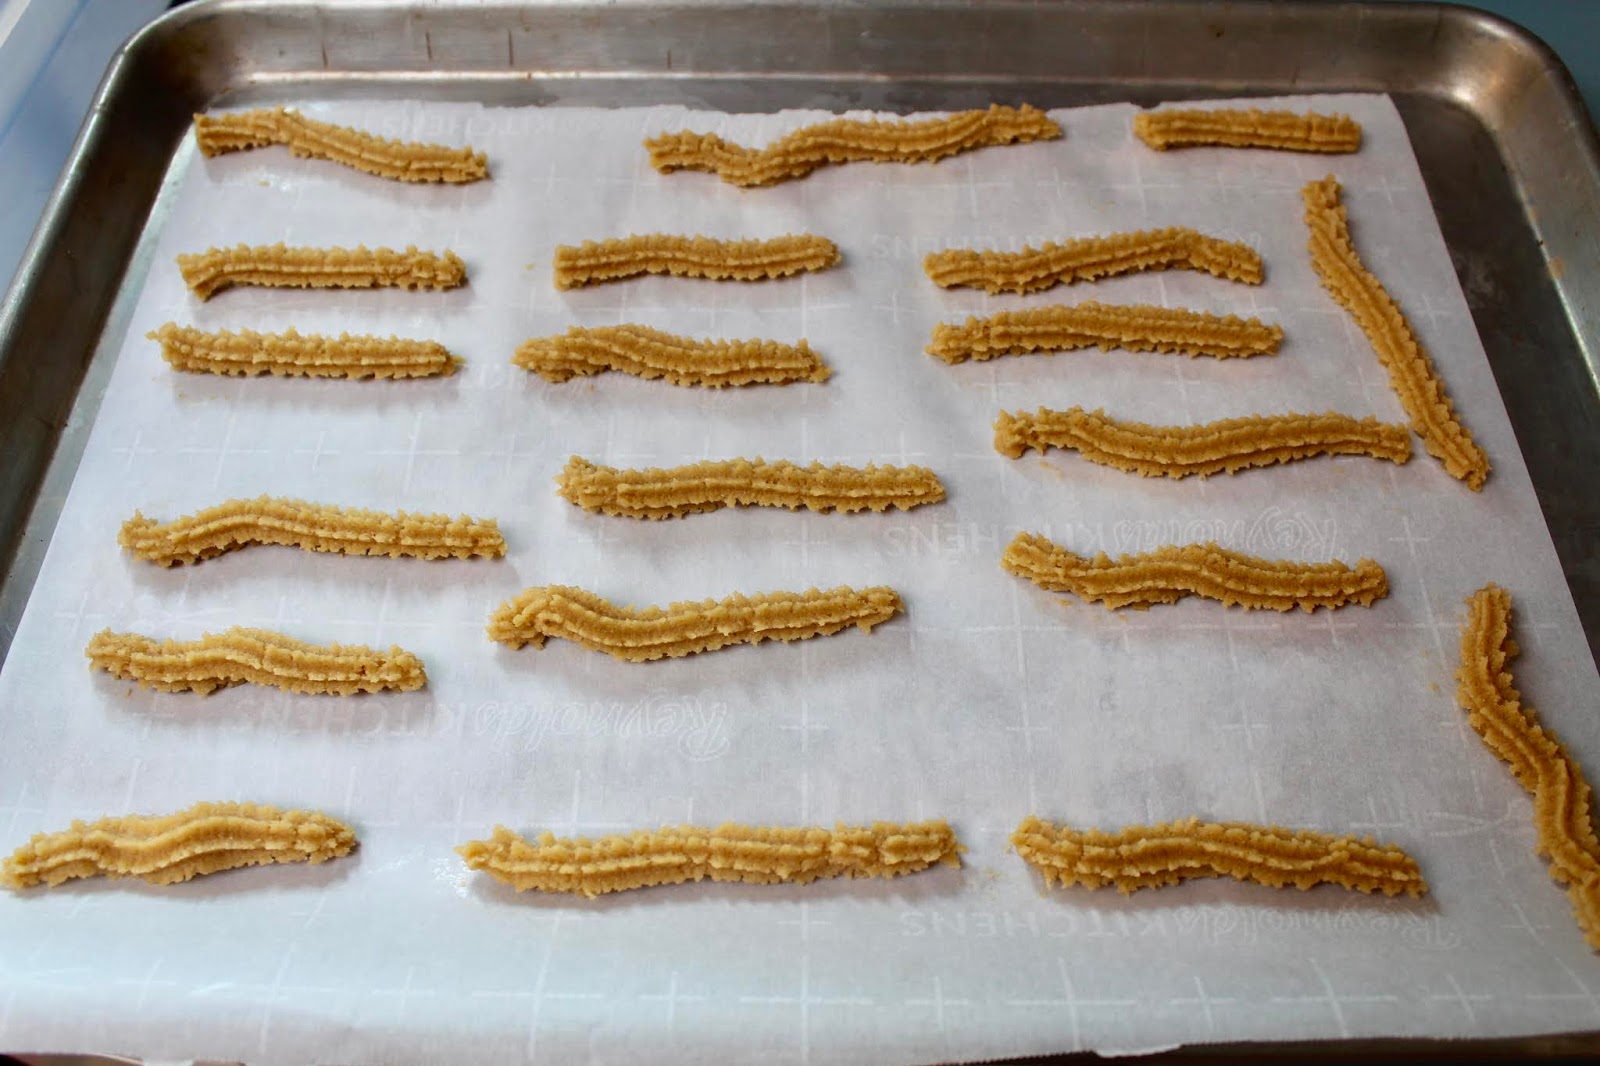
Keto Mozzarella Sticks

12 mozzarella sticks or string cheese sticks, cut in half making 24 cheese sticks
1/2 cup grated parmesan cheese
1/2 cup crushed pork rinds, or pork dust
1 Tbsp. Italian seasoning
1 tsp. granulated garlic
3 Tbsp. coconut flour
3 eggs, beaten

Oil for frying, or cooking spray if cooking in air fryer

Mix grated parmesan cheese, crushed pork rinds, Italian seasoning and garlic in a small bowl.  Beat the eggs in a second bowl, place coconut flour in a third bowl.  Line a baking sheet with parchment.

Dip each cheese stick in coconut flour, then egg, then cheese/pork rind breading, pressing to make breading stick.  Place coated cheese stick on baking sheet.  Repeat with all the cheese sticks.

Repeat the egg and pork dust breading steps with each cheese stick a second time.  This is important so the cheese doesn't melt and ooze out during the cooking process.  Once all cheese sticks are coated well the second time, place in freezer about 5 hours or overnight (I just make a bunch, freeze and transfer to a sturdy container for whenever).

To cook cheese sticks in oil:
Heat about 2 inches of oil in a heavy pan to 350°F.  Place 3 or 4  frozen cheese sticks at a time in hot oil and let cook about 3-4 minutes or until coating is a golden brown, turn and cook second side for about 3-4 minutes or until golden brown.  Remove from oil and drain on paper towels. Repeat with more cheese sticks, as desired.

To cook cheese sticks in air fryer:
Heat air fryer to 400°F.  Place frozen cheese sticks in air fryer and spray lightly with cooking spray. Cook for about 5 minutes, turn and cook 2-3 more minutes or until coating is golden brown.  Cooking these in the airfryer does cause some leakage...don't worry they are still delicious and you get to eat the leaked out cheese, yum!

 Serve with sugar free marinara for dipping.

5 years ago:  Poached Eggs in Spicy Tomato Sauce
7 years ago:  Salmon Cakes

August 30, 2019  Sunrise 6:24 am  Sunset 9:16 pm  Temp H 68/ L 47°F


Wednesday, August 28, 2019

Spider Emergency


I had an emergency the other morning.  It was life threatening and life altering.

It is gets cooler this time of year.  The geese and cranes are starting their flights south, the leaves are turning color, there was a snow advisory for parts of the interior of Alaska last week, and the spiders are moving inside. All this happens every year, and while I don't want to, I can deal.  Except this morning.

I got up and went to make my first cup of coffee, it's early, it's chilly and I just want my coffee and to wake up a little and I see this...

If you can't tell, that is a spider on the pull-out base of my Kuerig.  I could't pull the coffee maker out to make my coffee, but I figured I could just make my coffee, from the other side, and not bother anyone.  Well, then the spider did this...
 And climbed up to where my coffee cup sit.  I screeched  quietly moved my coffee cup and tried to figure out what to do.  I decided I really needed coffee so I could be brave and I went to pick the spider up, carefully, with a sheet of paper and I could deposit him outside.  I put the edge of the paper in his walking path, and he jumped!  Another screech I quietly threw the paper aside and grabbed the Swiffer duster.  I picked him up and dumped him into the garbage, handle and all.  I hope he is living a happy spider life in the landfill.

Well, I got my coffee and sat down to enjoy the life bringing caffeine in peace.  I decided I needed a back up plan to get my coffee in case this happens again.  I thought coffee cookies would be the perfect thing. I can eat them with coffee, if the coffee maker is free or I could eat them and still get my daily dose of caffeine.  These are a win-win.


Keto Coffee Almond Straws
1 Tbsp. hot water
1/2 Tbsp. espresso powder
2 cups almond flour
2 Tbsp. coconut flour
1/2 tsp. baking powder
1/4 tsp. salt
1/2 cup butter
1/2 cup Swerve confectioner's sweetener
1 egg
1 tsp. vanilla

2 oz. sugar free dark chocolate

Preheat oven to 325°F.  Line tow baking sheets with parchment paper.

In a small bowl mix the hot water with the espresso powder until completely dissolved.  Set aside.

In a medium bowl, mix almond flour, coconut flour, baking powder and salt.  Set aside

In a medium bowl, or your mixer bowl, cream butter and sweetener until light and fluffy, about 2 minutes.  Add egg, vanilla and espresso.  Mix well.  Slowly add dry ingredients and mix until well combined.

Spoon mixture into cookie press fitted with the star or cheese straw disk.  Press straws onto parchment paper ( I made mine about 4 inches long which was one click of my cookie press).  Bake for 13-15 minutes until golden brown.  Remove from oven and cool.

Melt chocolate on a double boiler or in a microwave at 15 second intervals until completely melted.  You can add a tsp. of coconut oil to the chocolate to thin it a bit if desired.  Dip straws into chocolate, allowing excess to drip off, and place on parchment paper to cool and harden.  Or, alternatively, drizzle chocolate over straws in a zig-zag pattern.


August 28, 2019  Sunrise 6:18 am  Sunset 9:23 pm  Temp H 61/ L 44°F

Monday, August 26, 2019

Macadamia Nut Crusted Halibut with Garlic Cream Sauce


Macadamia nut crusted halibut in a puddle of garlic cream.
It was the weekend for hornet stings.  Hornets, wasps, I don't really know the difference but I do know we had some trouble with them in Seattle over the weekend.  

We were sitting outside with Gman and eating dinner, one pesky hornet kept buzzing us and landed on Gman's leg.  He was playing and didn't see it and bent his leg and started to squish the hornet, the hornet stung his leg.  Poor Gman didn't know what got him, but it hurt and he cried.  After we cleaned it and got an ice bag and some grandma cuddles he was doing better.

Then, the next day, we were at the park and a hornet landed on my finger and stung me.  I felt something and looked down to see that hornet just sitting on my finger. I flung it away only for it to continue to return and then sting me twice on the top of my foot!  We got out of there and Gman and I talked about our hornet stings for the rest of the weekend.

Well, Dave and I are home now, and other than a couple little red bumps, all is well with those stings.

It doesn't stop me from trying to get some sympathy from my husband (it's not really working), so I fixed this delicious halibut to make myself feel better.  The garlic cream sauce is so good, and so easy.  You can even make it when you have a hornet sting on your finger.


Macadamia Nut Crusted Halibut

4 3-4 oz. Halibut steaks, skin removed
1/2 cup roasted, salted macadamia nuts
1/4 cup grated parmesan
1 egg
2 Tbsp. coconut flour
2 Tbsp. coconut or avocado oil

Preheat oven to 350°F, warm a cast iron skillet (or other oven safe skillet) and add about 2 Tbsp. coconut oil.  Prepare breading station by whisking egg in a bowl with 1 Tbsp. water, place coconut flour in a second bowl. Chop macadamia nuts to a small grind (I use my coffee grinder reserved for nuts and spices or my food processor and pulse) and mix with parmesan in a third bowl.

Dip halibut in coconut flour and shake off well, dip in egg wash and cover with the nut/cheese mixture. In a cast iron skillet heated to medium-hight, brown the macadamia nuts, about 3-4 minutes a side.  Once halibut is browned, put cast iron pan in oven for 8-10 minutes or until fish flakes easily and is cooked through the middle.

Meanwhile, make garlic cream sauce.

Garlic Cream Sauce
1/2 cup butter
4 cloves garlic, minced
1/4 cup heavy cream

In a small heavy bottomed sauce pan, melt butter on medium low, add garlic and turn down to low.  Poach garlic for 8-10 minutes while fish bakes.  Add heavy cream and bring to a medium warm temperature.  Remove from heat, strain through a fine mesh strainer into a small pitcher or bowl.  Serve with halibut immediately.
Serves 4
I love the purple cauliflower I grew this year.

1 year ago:    New Adventures for Family
5 years ago:  Blackberry Cheesecake
7 years ago:  Nutella Meringues

August 26, 2019   Sunrise 6:12 am  Sunset 9:30 pm  Temp. H 64/ L 47°F

Thursday, August 22, 2019

Frosting Transfer Cookies


It is a good thing I have a day job.

We were heading down to Seattle for Gman's birthday. The theme for the party was Octonauts, a cartoon about an underwater animal group that helps other creatures and one of Gman's favorites.  I decided to use this opportunity as one of my cookie of the month decorating challenges.  I found Octonauts edible transfers on Amazon and ordered them, thinking what a fun surprise it would be for Gman.

Well, I made the sugar cookies, covered them with royal icing and let them dry (and I need to practice my piping techniques).  Then the night before we were leaving, I went about the job of transferring the little frosting disks to the cookies.  I had watched a couple of You Tube videos, read several tutorials about using edible transfers, and I figured I was ready.

20 cookies ready for their frosting transfers


First off, you use a mixture of Karo syrup and vodka to make an edible glue and I haven't used Karo syrup for about 3 years now so the two tablespoons left in the jar were pretty stiff.  I microwaved it and thinned it according to the directions on the You Tube video that made me an expert at this, and went about painting the sweet adhesive on to the cookies.  I stuck the frosting disks into the freezer for 5 minutes and brought them to the table.  They were supposed to just flick right off once they were frozen, but it was a very wet day and they were stuck.  I used a small paring knife to carefully peel a few off and get them stuck down.  It was working, but it was slow work.

My mom went on the internet and starting reading tips on how to get the transfers off easily.  One tip was to pop them into a warm oven to help dry them out.  Well, I had just had my oven on for dinner, so I threw the sheet into the oven, counted to 10 and opened the door to find the backing sheet melted and crumpled up like a Shrinky-Dink! I guess a "warm oven" doesn't mean 350°F.  Now my mom and dad were committed to this also. We cut and pulled and ripped a few apart and we managed to get 8 transfers, out of 20, on cookies.  That will have to be enough for Gman.
Dad, working hard to get a few usable transfers off the shrunk paper.
That was an 8 1/2 X 11" paper!

So, while I don't really call it a successful cookie decorating experience, I did get some useable cookies and I learned a lot!
8 cookies packed and ready for Gman.

Next time I'll stick to fish biscuits (Octonaut reference there!)

Sugar Cookies

1 cup butter
1 cup sugar
1 egg
1 tsp. orange extract, or vanilla or almond
2 tsp. baking powder
1 Tbsp. corn starch
3 cups all-purpose flour

Cream butter and sugar together until light and fluffy.  Add egg and vanilla, mix well.  Sift baking powder, corn starch and flour together.  Add slowly to butter mixture.  Divide mixture in half, wrap each half in cling wrap and shape into a rectangle.  Refrigerate for 30 minutes.

Roll dough to 1/4 inch thickness, cut out desired shapes and place on parchment lined baking sheets.  Refrigerate for at least 30 minutes or overnight.  Bake in a 350°F oven for 8-10 minutes, until just set but not browned.
Decorate as desired.

1 year ago:    Absence Makes the Heart Grow Fonder and Soft Tortillas
5 years ago:   Lobo
7 years ago:   Salmon on the Grill

August 22, 2019  Sunrise 5:59 am  Sunset 9:45 pm  Temp. H 57/ L 41°F

Monday, August 19, 2019

Apology for being Late to Work and Chocolate Muffins


Dear Boss,
I'm sorry I was late today, but there was a really good reason.  First, it was Monday, and we all know Monday mornings are tough.  Then, when I was cruising Facebook with my second cup of coffee, I ran across a post from All Day I Dream About Food with chocolate muffins.  Chocolate. Muffins. On Monday morning, so I had to make them.

So, I whipped up a batch of the Chocolate Muffins and I added some walnuts to the batter too, because - chocolate and walnuts. Then, instead of making mini muffins I made regular sized muffins.  I lined the muffins tins, spayed the papers (keto muffins really tend to stick), filled the muffins with the batter, filled the sink with water to wash the dishes while the muffins baked, and set the timer for 20 minutes. 

I happily washed the dishes as the timer ticked away.  Drank a little more of my coffee and turned around to see how much time was left on the timer (only 5 more minutes!) and noticed that I didn't put the muffins in the oven.  Nope, I set the timer and left the muffin batter on the counter.  So, I put the muffins in the oven, set the time for 20 minutes again and drank a third cup of coffee, I obviously needed it. 

After 20 minutes I tested the muffins and because I made regular sized muffins, not the mini muffins in the recipe, I needed more time.  I set the timer for 5 minutes, checked and added 5 more minutes, now they were done.  So, the muffins that should have taken me about 25 minutes to make have now taken me about 50 minutes, and I haven't even showered yet.

So I rush upstairs to get ready for work while the muffins were cooling. I was just a little late for work, but I have warm chocolate muffins in tow...does that make up for it?
Chocolate Mini Muffins
Find the recipe at: All Day I Dream About Food, Mocha Mini Muffins

I made 8 standard sized muffins and baked for a total of 30 minutes.

1 year ago:    Feeling Sorry for Myself and Friends Moving
5 years ago:  10 Meal Workshop
7 years ago:  Cabbage Salad

August 19, 2019   Sunrise 5:50 am  Sunset 9:56pm  Temp. H 57/ L 40°F

Friday, August 16, 2019

Embracing Fall and the Decorated Cookie Challenge with Maple Shortbread


After making my friend's birthday cupcakes, I realized I needed some practice in the decorating department.  I have decided to challenge myself to decorate cookies at least once a month for the next twelve months and to learn some different techniques.  I cruised Pinterest, I watched a couple videos on You Tube, I shopped at JoAnns in the food decorating aisles and I went to work. I figured for the first month, I should make it something easy, I don't want to rush into anything.

Well, Fall is creeping into the corners of Fairbanks, the leaves have a slight yellow haze to them, trees are starting to lose their leaves, and the brush is turning yellow and red, blueberries are ripe and the days are cool and rainy.  I always say "Embrace the cold." as winter starts, so I decided to embrace Fall.  I made some fall leaf cookies flavored with maple.

In my defense, these are my first attempt and I did figure out some things I will change the next time I make them.  And while they don't look at good as I would like, they did taste good.  The crumbly texture of the maple shortbread with the sweet maple glaze was a good combination (however the crumbly nature of the shortbread cookies made it harder to dip in the glaze with the edges breaking and crumbs getting into the glaze).

A basket of Fall cheer for a friend.

So, here is my first month's attempt at decorated cookies.  I'm sure I'll practice this technique again so if you leave your car unlocked and find some marbled cookies inside, they just might be from me.
The "seconds" made it to work with me.

Maple shortbread:

1 cup butter, softened
1/4 cup sugar
3 Tbsp. cornstarch
1 tsp. maple extract
1 3/4 cups all purpose flour

Cream butter and sugar, add cornstarch and mix.  Add maple flavoring, mix.  Add flour slowly and mix until just combined.  Shape dough into two disks, wrap in cling wrap and refrigerate for at least 1 hour or until ready to use.

Once chilled, roll dough to 1/4 inch thickness and cut into desired shapes.  Place on cookie sheet that has been lined with parchment paper.  Refrigerate for 30 minutes.
Bake at 325°F for 20 minutes.  Remove from oven and cool for 5 minutes, remove to wire rack to cool completely.

For Glaze:
1 cup confectioner's sugar
1/4-13 cup maple syrup

Mix syrup into sugar until desired consistency is achieved.  Glaze cookies.

For marbled effect:
Separate glaze into three bowls, color glaze with color concentrate to make desired colors (I used yellow, red and orange).  On a plate or bowl add some of each color, swirl with a knife to make a marbled effect.  Holding cookie carefully by the edges, dip cookie into glaze, making sure to get all the edges (yes, your fingers will get glaze on them).  Hold cookie over plate and let excess drip off.  Turn and place on drying rack with paper underneath to catch drips.  Using a toothpick, pop any air bubbles that rise to the surface before the glaze begins to harden.  Add more glaze to plate as needed.

1 year ago:    Rhubarb Crumble and the Windfall
5 years ago   Peach Cobbler and the Newlyweds
7 years ago:  Zucchini Cheese Tart

August 16, 2019  Sunrise 5:40 am  Sunset 10:07 pm  Temp. H 57/ L 45°F


Wednesday, August 14, 2019

Coffee Ice Cream


I'm on a real ice-cream kick this summer.  I have always loved ice cream, but the store keto ice creams leave something to be desired.  Making keto ice cream is so easy there really is no excuse not to have some in your freezer at all times.  Right now I have strawberry cheesecake ice cream, keto butter pecan ice cream, and this coffee ice cream.
I've added chocolate chips and made ice cream sandwiches.

The cookies are these double chocolate cookies


My mom loves coffee ice cream and when I had some egg yolks I needed to use I asked her what flavor she wanted and she chose coffee.  My mom and I like a strong coffee flavor, you can adjust that to your liking, but this was perfect for us!

Coffee Ice Cream

2 cups heavy cream
1 cup strong coffee
1/2 to 1 tsp. instant espresso powder, start with less and add if needed
1/3 cup sweetener, I like Boca Sweet for ice cream (it helps to keep it softer)
4 egg yolks
1 tsp. vanilla extract
1 Tbsp. vodka, helps with iciness and is optional
1/2 tsp. xanthan gum

Optional add-ins:
chocolate chips
cocoa nibs
sugar free chocolate fudge or sauce

In a medium saucepan, heat heavy cream, coffee, espresso powder and sweetener.  Bring to 165°F.  While the cream is heating, whisk 4 egg yolks in a heat resistant bowl and set aside.
Once the cream is at the proper temperature, whisk 1 cup of the hot cream mixture into the egg yolks slowly to warm egg yolks.  Once the cream is mixed in, pour the egg cream mixture into the rest of the hot cream in the saucepan and bring to 170°F.  Remove from heat, strain through a wire strainer into a bowl and refrigerate for 3 hours or overnight. Whisk in vanilla extract, vodka and xanthan gum, whisking quickly so no lumps remain.
Process in ice cream maker according to your model's directions.
1 year ago:    Grilled Chicken Thighs 
5 years ago:   Chocolate Zucchini Bread
7 years ago:   Moose Sausage Stuffed Zucchini

August 14, 2019  Sunrise 5:34 am  Sunset 10:14 pm  Temp. H 65/ L 53°F


Monday, August 12, 2019

Sugar Free Peanut Butter Truffles and Getting Rained Out


There are a few things in life you can depend on, you gotta pay taxes, you need air and water to live and it will rain in Fairbanks the week of the Tanana Valley State Fair.  Well, I paid my taxes, I am breathing, I drank some water and, even as I write this, it is still raining.

We didn't really think things through or we would have stayed home last weekend.  The fair started on Friday and we headed out of town for the White Mountains and our favorite camping spot.  We only have two weekends left before my parents head back down to Tucson for the winter.  A little rain wasn't going to discourage us!  We are Alaskans.

Friday night we pulled into the White Mountains and our favorite camp spot was taken.  No problem (with a little grumbling from me), we moved down the road to the end by the river.  It was raining but we put out the awning and Dave grilled some wonderful burgers and I made a salad and some tator tots in the camper (nothing fancy on Friday nights).  We had a good dinner and played some cards and went to bed a little earlier than usual.  The sound of the rain hitting the roof of the camper is one of my favorite sounds, and the 40 mile an hour wind gusts rocked the camper and us to sleep.

In the morning, the area we were in was flooded.  The river had risen and was overflowing into our little part of the gravel.  Once everyone was awake and moving, we decided to move to higher ground.  The person who was in our favorite spot gave up and moved on so we moved into the gravel bar and out of the water.
This area is usually dry!  The water was right up to the firepit.
Dave's rock tower, two of the rocks are underwater.
The other side of the motorhome, again usually dry.

We had a late breakfast, played some cards and, since it was still raining, took a nap.  Dave built a fire and sat under a pop-up to stay (somewhat) dry.  I woke up from my nap and Dave came in to play cards.  My parents had lunch and a nap in their camper.  I looked out at the gravel bar and said, "Wow, look at all that standing water."
"It's not so much," Dave replied.
"Um, Look at that gushing little stream emptying into the gravel bar." I pointed out.
"Hmm, let me see where that is coming from." Dave said.
He headed off down the road, that was now full of water, and I started to pack up.
Not 5 minutes later, Dave came running back down the road and told me it was time to throw and go!
He let mom and dad know we needed to leave.  The main river on the left of us had overflown the banks in 3 places and was quickly filling the whole area with water.  The small stream on the right of us had also breached the banks and was filling the gravel bar we were on.  The road out was a running stream and the usually quiet little river was a mass of muddy running water and rapids.

So we packed up, got the wet dogs in the camper and headed home.  We had wonderful steaks and shrimp at home after we all dried off and got dry clothes on.

It all worked out well, we had a bit of an adventure and we were home all day Sunday so I could get the shopping done and make this treat.

I made this treat for a friend who was diagnosed with cancer and part of his treatment is to go sugar free.  I wanted him to see that sugar free didn't need to be "delicious treat free" and he seemed to enjoy it.  The really nice thing is this makes about 36 pieces so there was enough to share and some for home too!  Better than getting rained out over the weekend.


Peanut Butter Truffles or Sugar Free Buckeyes

1/2 cup butter
3/4 cup peanut butter
1/3 cup powdered swerve
2 cups defatted peanut butter flour, I use PB2
1/2 tsp salt
3 oz. chocolate, I use lily's dark
1 scant Tbsp. coconut oil
peanuts for top, optional

Line a large sheet tray with parchment paper.  Set aside.

In a medium microwave-safe bowl, melt butter and peanut butter.  Add sweetener, peanut butter powder and salt.  Mix well until it is fully incorporated and a dough consistency.  Roll into 36 1 inch balls.  Place on prepared sheet pan and freeze for 1 hour or place in refrigerator for 3 hours or overnight.

In a heat safe bowl melt chocolate and coconut oil (I use a microwave but you can also use a double boiler).  Stick a toothpick in the top of the cold peanut butter ball.  Dip ball in chocolate and let excess drip back into the bowl, I like to tap is lightly and then gently scrape the excess off the bottom.  Place on sheet pan to harden.  Remove the toothpick gently and push the toothpick hole closed with your finger or top with a peanut.

1 year ago:    Spinach-Artichoke Pull Apart Rolls and the Last Camping Trip of the Season
3 years ago:   End of the Camping Season
5 years ago:   Blackberry Cobbler and Sand Art

August 12, 2019  Sunrise 5:27 am  Sunset 10:21 pm  Temp. H 67/ L 54˚F

Friday, August 9, 2019

Easy Chicken Cordon Bleu and the Toe Issue


I'm not saying my husband deserved this, but he has been telling everyone since I had foot surgery this year he was off the hook...not so much.

About a week ago, Dave woke up with such a pain in his foot he couldn't walk.  Well, not really his foot but his big toe.  He thought he had sprained it or hurt it somehow while he was working on the truck but he couldn't think of a time that he would have hit it hard enough for it to hurt this much.  He was talking to my dad and my dad said it sounded like gout.  Dave googled it and talked to a friend and sure enough it did sound like gout.  Dave called my foot dr. and piggy backed on to my next appointment a bit more than a week away.  He iced, ate tart cherries and tried to stay off it as much as possible.

Well, we went to the foot dr. and sure enough, the diagnosis was confirmed.  Dave was given a couple of options, no red meat, no beer, no shrimp and some meds to get this episode under control or cut back on red meat, beer and shrimp and some meds to get this under control then some meds to prevent this from happening again.  Guess which one he chose (I actually laughed out loud at the doc when he said Dave had to stop eating red meat and drinking beer).

So, while I have always tried to get him to eat more chicken and fish he is now more on board with it than before.  And while he won't be giving his red meat and beer up, he did decide he would cut back.

I made this chicken dish trying to get him to happily eat chicken, I'm always trying.
I love the purple cauliflower

Easy Chicken Cordon Bleu

2 chicken breasts
8 slices deli ham
4 slices Swiss cheese
2 Tbsp. dijon mustard
salt and pepper
1/2 cup crushed pork rinds
1/4 cup grated parmesan
1 egg

Preheat oven to 350°F.  Line a baking sheet with parchment.

Make breading station by whisking egg with 1 Tbsp. water in a small bowl and mixing pork rinds and parmesan in a second small bowl, set aside.

Slice chicken breasts horizontally and lightly pound each cutlet to make an even thickness.  Sprinkle salt and pepper over each cutlet, spread mustard on each cutlet.  Lay 2 pieces of ham and 1 piece of cheese on each cutlet, roll starting with the thinnest side and secure with a toothpick.  Dip chicken roll in egg and then into the pork rind/parmesan breading.  Place on cookie sheet.  Repeat with the other three chicken rolls.
Bake for 30 minutes.  Remove toothpicks and serve.

1 year ago:    Blueberry Picking and Blueberry Crumble
3 years ago:  Introducing Grayson Zachary and the Beginning of the Grandma Adventure
5 years ago:  Chicken with Mushroom and Almonds and the Prank

August 9, 2019  Sunrise 5:17 am  sunset 10:32pm  Temp. H 70/ L 50°F


Two of my favorite boys, in July.


Wednesday, August 7, 2019

Birthday Cupcakes

Covered with plastic for the delivery.
Well, it has been a while since I baked something with white flour and white sugar, but a friend was having a birthday and she needed some cupcakes to help her celebrate her day.  I set aside some time Sunday to bake and decorate, and took twice as long as I thought I would.

To start with, I made a chocolate cupcake with cream cheese centers, and filled them way too much, the first batch were so big they all stuck together and it looked like one big cake.  I cut them apart, put them aside and started on the second batch.  They turned out just the right size.

Then I decided this was the perfect time to pull out my never-before-used Russian decorating tips. I watched a couple You tube videos on how to use them and I made buttercream just like the recipe on Pinterest called for, how hard could it be? Well, I could not get those damn flowers to stick to the cupcakes...the buttercream was just too tight.  So I went to plan B and added more cream to the buttercream and winged it with the other tips I had.  They weren't wonderful, but they were o.k. and I decided I needed to bake more often and practice a bit more.

While I didn't have one, I was told they were delicious.  So if you need a good chocolate cupcake, this is the recipe for you.  And I have some Russian decorating tips I can lend you, but I think they might be defective, I'm just saying.
Dave delivered them for me, I forgot to take a picture at home!


Chocolate Cupcakes
makes 24 (not 12 like I tried the first time)

2 cups sugar
1 3/4 cup all purpose flour
3/4 cup unsweetened cocoa powder
1 1/2 tsp. baking powder
1 1/2 tsp. baking soda
1 tsp. salt
2 eggs
1 cup milk
1/2 cup vegetable oil
2 tsp. vanilla extract

Preheat oven to 350˚F.  Line 24 cupcake  tins with liners.  Combine dry ingredients in a large bowl and whisk together.  Add all the wet ingredients and mix on low for about 30 seconds, then on med-high for 2 minutes.
Fill  cups 1/4 full.

For Cream Cheese filling
8 oz. cream cheese
1/4 Tbsp. sugar
1 egg

Cream cream cheese and sugar together until well combined and smooth.  Add egg and mix until completely incorporated.

Spoon a dollop of cream cheese on top of cake batter in each cupcake well, dividing evenly.

Top cream cheese with cake batter filling the cups about 2/3 full (not too full or they will rise and grow into one giant cupcake!)

Bake for 25-30 minutes until a toothpick inserted near the center comes out clean.  Cool in cupcake tins for 10 minutes, then remove to a wire cooling rack and let cool completely.

American Buttercream

2 cups butter
1/4 cup vanilla instant pudding mix (or cornstarch if you don't have pudding mix)
2 Tbsp. heavy cream, plus more for consistency
1/2 tsp. salt
2 tsp. vanilla extract, or flavoring of choice
2 lbs. powdered sugar

Sift your powdered sugar into a large bowl - do it or your frosting will be lumpy, yech.
Mix butter, pudding mix, 2 Tbsp. cream, salt and vanilla together until very smooth.  Add powdered sugar by spoonful to incorporate slowly.  Mix until smooth but do not whip, you don't want air in your buttercream.

Color with gel colors of choice, if desired, and decorate or use white and frost.

August 7, 2019  Sunrise 5:10 am  sunset 10:39 pm  Temp. 66/ L 48°F

1 year ago:     Sausage and Egg Cups for Breakfasts on the Go
3 years ago:   Saving a Life
5 years ago:   Nutella Pillows and My Kindness


Monday, August 5, 2019

Raspberry Lemon Drop Martini - Keto remake


Since I had surgery on my foot 6 weeks ago, my dad has been doing the watering for me.  Everyday he waters the greenhouse, the hanging baskets, the flower beds and the flower and vegetable boxes.  He also started picking the raspberries a couple weeks ago.  He goes out every day and picks the ripe raspberries, my mom goes out and helps him.  We rinse the berries and I pop them on a sheet pan and into the freezer and once they are frozen I put them in a large ziplock.

Well, the berries are fresh and so flavorful that I have been using them in things like this raspberry cheesecake fool and a keto friendly remake of this raspberry lemon drop martini.

My parents are leaving on the 15 of this month and I'll have to take over the watering duties, although gardening is almost over for Fairbanks by then so I'll just focus on garden clean-up.  In the meantime, I'll have another one of these and watch the watering continue.
Yes, that is a Christmas tree charm on my glass.
I leave it there all year!

Keto Raspberry Lemon Drop Martini

6 fresh or frozen raspberries
1 Tbsp. fresh lemon juice
2 tsp. powdered swerve, or sweetener of choice
3-6 drops stevia glycerate, optional and to taste
2 oz. good vodka
lemon sparkling water

In a cocktail shaker muddle raspberries, lemon juice, swerve and stevia until raspberries are broken down and sweetener is dissolved.  Add vodka and shake until cold and well mixed.  Pour into glass (you can strain if you don't want the seeds, but I don't strain this drink) and top with a splash of sparkling water. 

August 5, 2019  Sunrise 5:04 am  Sunset 10:47pm  Temp. H 62/ L 53°F


1 year ago:    Lemon curd Ice Cream and the Mad Dash
3 years ago:  The REAL Grapenut Bread
5 years ago:  Brandy Alexander and New Cookbooks