Monday, July 30, 2012

White Chocolate Macadamia Cookies


I know most of you are in the middle of the warmest part of your summer.  But, summer in Fairbanks is winding down.  One of our neighbors even had the nerve to mention some yellow leaves they saw on the ground.

Our tomatoes are beginning to produce lots of red beauties, the broccoli, cauliflower, and cabbage are all ready to harvest (always all at the same time), the farmer's market is full of produce, and we start to put our yard away for the winter.
Huge broccoli ready to be harvested.

We begin by cutting back the plants that have flowered out, the irises, the lilies, the delphinium, the yard starts to look a little bare.  We save the hanging baskets until the very end, but sometimes it is hard to tell when to pull the plants.  We can get a hard frost in August or we can wait until mid to late
 September with just a few nights where you cover your plants.  The last few years have been on the warmer fall side, I'm not complaining.
The lilies after they were cut. Click here to see them in full bloom.

Dave worked hard this weekend, getting caught up from us being in the real world, and the beginning of putting away the yard.  He really doesn't have a sweet tooth, but this is one cookie he loves.  I mixed this up, baked a dozen and put the rest in the freezer to bake later.  He ate one and I gave the rest to the boys across the street.  Dave complained I gave them all away!  Won't he be surprised when I pull fresh, warm cookies from the oven after dinner for the next couple of weeks.  He works hard, he deserves it.

White Chocolate Macadamia Cookies
adapted from Celebrating Cookies, Leisure Arts


1 c. butter, softened
1 c. firmly packed light brown sugar
1/2 c. granulated sugar
2 eggs
1 tsp. vanilla extract
2 1/4 c. all purpose flour
1 tsp. baking soda
1 tsp. salt
1 c. macadamia nuts, coarsely chopped
2 c. white chocolate chips

Cream butter and sugars until light and fluffy.  Beat in eggs and vanilla.  In a separate bowl, combine flour, baking soda, and salt; gradually add to the creamed mixture.  Stir in macadamia nuts and white chocolate.

Drop by heaping teaspoonfuls onto greased baking sheets.  Bake at 350ºF for 10-12 minutes.  Cool cookies slightly on baking sheets, transfer to wire racks to cool.

Makes about 6 dozen cookies


Tips:
I keep my chocolate and nuts in the freezer.  Just add them to the cookie dough frozen, it helps skip the step of putting them into the fridge for 1/2 hour for the butter to firm up and helps prevent the cookies from spreading so much.

I use a #40 scoop for my cookies so I got about 4 dozen cookies instead of 6.
Random picture of the blond boy and the DIL (Daughter In Law) from our trip to the real world.

July 30, 2012     Daylight 18  hours, 20 minutes     Current Temp. 65ºF

Monday, July 23, 2012

Light Cheesecake


We just returned from a week in the "real world."  The blond boy got married and a week in San Diego for the festivities was wonderful.  The two Oregon boys drove down with their chicks, and the Alaska boy flew down a couple days after us.  A baseball game for the rehearsal dinner and a lovely wedding looking over the beach made for a fun fabulous wedding week.  I'll post pictures later, and do a slide show, and a lecture...

The curly haired boy had his birthday last weekend. How did they grow up so fast (and I haven't aged a day!).   I was very thankful to be able to spend it with him in California after the blond boy's wedding.  We had an amazing week with our kids and families and I'm sorry to be back in Alaska away from the "real world" and the boys.

The curly haired boy loves cheesecake.  That is what he wants for his birthday, no regular cake for him.  This year I had to purchase a cheesecake since we were in a rental house and had a very busy schedule.  But, I love cheesecake too and I don't love all the calories, so I made a lower-fat version that rivals any cheesecake I've ever made.

This cheesecake uses some very smart swaps, like 1% cottage cheese, blended in the food processor until smooth, 1/3 less fat cream cheese and non-fat Greek yogurt.  A hit of lemon zest brightens up the flavor and makes it the perfect cheesecake for fresh berries.  Even the curly haired boy would love this, and he is picky about his cheesecakes.
Light New York Cheesecake
adapted from Cook's Illustrated, The Best Light Recipes

Crust
7 graham crackers
1 cup fiber one cereal
3 Tbsp. melted butter
1 Tbsp. water

Filling
16 oz. 1% cottage cheese
16 oz. 1/3 cream cheese
8 oz. low fat Greek yogurt
1 1/2 c. sugar
1/4 tsp. salt
zest from 1 lemon
1 Tbsp. vanilla extract
3 large eggs, room temp.
Berry topping, optional

1) for the crust: Preheat oven to 325ºF.  In food processor, process graham crackers and fiber one until fine crumb stage.  With processor running, add melted butter and water, pulse food processor to mix until all crackers are coated.  Press into bottom of 9" springform pan.  Bake for 10-15 minutes until crust is fragrant and beginning to brown.  Cool on wire rack.

Increase oven temp to 500ºF.
2) for the filling:  Meanwhile, line a medium bowl with a clean dish towel or several layers of paper towels.  Spoon the cottage cheese into the bowl and let drain for 30 minutes.

Process the drained cottage cheese in a food processor until smooth and no visible lumps remain, about 1 minute, scraping down the work bowl as needed.  Add the cream cheese and Greek yogurt and continue to process until smooth.  Add the sugar, salt, lemon zest, and vanilla and continue to process until smooth, about 1 minutes, scraping down the sides of the bowl as needed. With the processor running, add the eggs one at a time and continue to process until smooth.

Being careful not to disturb the baked crust, spray the insides of the springform pan with vegetable oil spray.  Set the springform pan on a rimmed baking sheet.  Pour the processed cheese mixture into the cooled crust.

Bake for 10 minutes.  Without opening he oven door, reduce the oven temperature to 200ºF and continue to bake until an instant-read thermometer inserted into the center of the cheesecake reads 150ºF, about 1 1/2 hours.

Cool on a wire rack until barely warm 2-3 hours.  Run a knife around the edge of the cake and remove the ring.  Refrigerate until cold at least 3 hours.

Let cheesecake stand at room temperature for 30 minutes before serving.
Serve with fresh fruit or berries.

July 23, 2012

Friday, July 20, 2012

Barbecue Sauce


I have made this sauce for years.  Everyone would ask for it but I wouldn't share it, I was going through my stingy phase.  But, I would make batches and give as gifts.  Pretty soon everyone would ask for a batch for their special occasions.  My brother in law loved the sauce and he would request it for all kinds of meats, ribs, chicken, flank steak, then he would come over for dinner and look through the garbage can to see if he could figure out the ingredients for the sauce!
Finally, about 5 years later, I told him his retirement gift would be the sauce recipe.  On the day of his retirement picnic, he came over and I put the magazine I got the recipe from in front of him.  He just laughed and said by this time he would just come over and eat it at our house.  So, after years of hoarding this recipe I'm going to share...and ask forgiveness of all my friends who asked for the recipe and I said no.  I didn't make it up (I never said I did) and it is so good, once you try it you will make it over and over.

Barbecue Sauce
adapted from Simply Perfect grilling 2005

1 Tbsp. butter
1 Vidalia onion or other sweet onion
3 cloves garlic, minced
1 10 oz. jar apricot spreadable fruit
1 12 oz. jar chili sauce
1/3 cup spicy brown mustard
1/4 cup cider vinegar
3 Tbsp. molasses
1 Tbsp. Worcestershire sauce

In a medium saucepan, melt butter over medium-low heat.  Add onion; cover and cook for 13-15 minutes or until onion is tender, stirring occasionally.  Uncover; cook and stir ovr medium-igh heat for 3 to 5 minutes more until onion is golden.

Add garlic; cook and stir for 30 seconds more.  Stir in apricot spreadable fruit, chili sauce, mustard, vinegar, molasses and worcestershire sauce.  Bring to boil, reduce heat and simmer uncovered about 20 minutes or until sauce reaches desired consistency, stirring frequently.  Cover and store in the refrigerator for up to 1 week.  Makes about 3 cups.

Tips:
The original recipe called for peach simply fruit, I can't find that in Fairbanks so I use apricot.  Using peach jelly or jam (with all the added sugar) makes it too sweet for me.

I have thought about trying fresh peaches and cooking them down, but have never gotten around to it, so if you try it let me know how it turns out.

I have put this on everything from beef, pork, chicken, and salmon.  I didn't like it on salmon though.

I often make a double batch and freeze half of it so I always have some on hand.  We seldom buy barbecue sauce from the store (unless I've been lazy).

July 20, 2012

Wednesday, July 18, 2012

Grandma's Beans


I was pretty selfish about sharing good recipes for a while.  I wasn't always that way, I used to always share but then...
My grandma Stejer was a wonderful cook, I have many delicious memories from her kitchen.  One of the dishes she always made was this bean dish.  We loved it, the sweet and sour sauce with the salty bacon and sweet onion and all those different beans.  Grandma would make a double batch and often that is all I would eat, I love them so much.
Everyone that ate them would ask for the recipe and when we were invited to dinner the request would always be, "Will you bring Grandma's beans?"
I would bring the beans and the recipe, good food is meant to be shared.
One day, I received one of my favorite cooking magazines.  I had a cup of coffee and was happily reading through it when I came across my grandma's bean recipe and the person who submitted it said, "I got this from a friend in Alaska."  Well, it pissed me off kind of made me a little angry.  She had not mentioned the fact that this dish came from my grandma, that my grandma lovingly made this for us all the time, and my "friend" had her name attached to the recipe for all the world to see.  Why this made me so angry, I don't know, but it did.  I think credit needs to go where credit is due and it was my grandma that should have gotten the credit (even thought I'm sure she got the recipe from someone else anyway).  Well, my thought process is never completely logical, jut ask my husband, and from then on I was very stingy with my recipes.
So, here is the recipe for Grandma's beans.  I got the recipe from my Grandma Stejer (her picture is here) and they are delicious.  All summer I made them for cook-outs and in the winter I make them to serve with warm bread from the oven and it is the perfect meal.

Grandma's Beans
from Grandma Stejer


8 bacon slices, fried until crisp, drained and crumbled
4 large onions, peeled and cut into half rings
1/2 to 1 cup brown sugar
1 tsp. dry mustard
1/2 tsp. garlic powder
1 tsp. salt
1/2 cup cider vinegar
2 (15 oz) cans butter beans, drained and rinsed
1 (15 oz) can green lima beans, drained and rinsed
1 (15 oz) can dark red kidney beans, drained and rinsed
1 (15 oz can black beans, drained and rinsed
1 (1 lb. 11 oz.) can New England Style baked beans - undrained

Place onions in skillet, add sugar, mustard, garlic, salt and vinegar.  Cook 20 minutes, covered.  Place rinsed and drained beans in a dutch oven or roaster pan, top with undrained New England Style beans. Add onion mixture to beans, stir well.  Add crumbled bacon and bake at 350ºF for one hour.

Tips:
Start with 1/2 cup brown sugar and go up to your taste.  I love sweet and I use 1/2 cup.

Any type of baked beans will work if you can't find the New England Style.  I can't in Fairbanks and I use a country "grilling" type can of beans.  Just use something you would like, although I've never used a spicy kind.

When baking I usually bake for 30 minutes covered then 30 minutes uncovered.  It keeps a lot of the sauce but reduces it some so it is a little thicker.

In the winter, I mix this up and put it in my crock pot on low.  Add a loaf of crusty bread and dinner is ready when I get home.

July 18, 2012

Monday, July 16, 2012

Chicken Pot Pie


It had been a really bad day.  It was late Spring, a cold and rainy day.  The day had won, and I had cried on the phone to my husband (if you don't already, you should really feel sorry for my husband).  Dave decided to turn my frown upside down and planned a surprise for me.  He was going to build a fire, pour a good glass of wine and take me out to dinner, what a sweetheart!  It did not go as planned.

He started by getting the fire ready, or trying to.  When he opened the door to the wood stove, a bird flew out, brushing his face on the way by!  Keep in mind, it was Spring and we hadn't used the wood stove for about 6 weeks.  Some poor bird had roosted on the edge of the chimney and fallen down the pipe, then was stuck in the closed wood stove.  The poor bird flew back and forth from the large living room windows to the large kitchen windows, trying to find a way out.  Poor Dave, chased the bird back and forth trying to catch it by throwing a towel over it to get it outside.  The bird flew, leaving black soot marks on the ceiling every place it hit and Dave chased back and forth until he finally caught the bird and released it into the open air via the back door.

Not swayed from his mission, Dave built the base for the fire, newspaper, kindling and wood, and started it.  He heard a frantic rustling in the stove pipe, another bird was in the chimney.  He rushed to put the fire out, pulling burning newspaper and kindling onto the hearth and filling the house with smoke, and then proceeded to chase that bird back and forth, back and forth until it was finally caught and released into the wild.
Two visitors to our bird feeder.  Dave says the bird feeder is why we had birds in our chimney!

This kindhearted man bent down to rebuild the fire, again, so the house would be nice and toasty when I got home...that is about the time I got home.  When he looked up from the wood stove, he was hot, sweaty and ash streaked from the birds flying past his face.  The ceiling was black marked from the ash covered bird heads hitting it and the house smelled of smoke.  I burst into laughter as did he.  Poor guy, goes to show you, no good deed goes unpunished.

About that time my brother-in-law pulled up for dinner.  We opened a window to air out the house and left the black streaks on the ceiling for another day.  A good glass of wine (or two) and the story being retold by Dave for my brother-in-law and me really did chase away the bad day.  Too bad  it was such a bad day for Dave, not to mention those poor little birds.

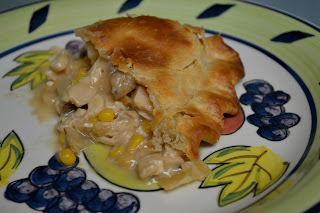
For cold, rainy spring or summer days nothing warms up the house like a fire in the wood stove and a hot bubbling chicken pot pie fresh from the oven.  The blond boy is particularly fond of chicken pot pie and this used to be a regular on the dinner menu when he lived at home.

Chicken Pot Pie
3 whole (6 split) chicken breasts, bone-in, skin-on
3 tablespoons olive oil
Kosher salt
Freshly ground black pepper
4 cups chicken stock, preferably homemade
2 chicken bouillon cubes
4Tablespoons unsalted butter
2 cups yellow onions, chopped (2 onions)
1/2 cup all-purpose flour
1/4 cup heavy cream
2 cups corn, thawed if frozen
1 cup diced potatoes
crust for a double crust pie
cream to brush on pastry top, optional

Preheat the oven to 350º F.
Place the chicken breasts on a baking sheet and rub them with olive oil. Sprinkle generously with salt and pepper. Roast for 35 to 40 minutes, or until cooked through. Set aside until cool enough to handle, then remove the meat from the bones and discard the skin. Cut the chicken into large dice. You will have 4 to 6 cups of cubed chicken.
In a small saucepan, heat the chicken stock and dissolve the bouillon cubes in the stock. In a large pot or Dutch oven, melt the butter and saute the onions over medium-low heat for 10 to 15 minutes, until translucent. Add the flour and cook over low heat, stirring constantly, for 2 minutes. Add the hot chicken stock to the sauce. Simmer over low heat for 1 more minute, stirring, until thick. Add 2 teaspoons salt, 1/2 teaspoon pepper, and heavy cream. Add the cubed chicken, corn, potatoes. Mix well.
Preheat the oven to 375º F.
Line pie plate with first pastry, carefully pour in filling, cover with second pastry and cut slits for steam to escape. Brush pastry top with cream.  Place on a baking sheet and bake for 1 hour, or until the top is golden brown and the filling is bubbling hot.

Tips:
I have been known to purchase a rotisserie chicken from the grocery store and use that instead of the chicken breasts.

I have also been known to use a pkg. of frozen mixed veggies.

My first chicken pot pies were made from store bought crusts,  a rotisserie chicken, a can of mushroom soup, a jar of chicken gravy and a bag of frozen veggies.  My kids loved it!  You will love this one even more.

July 16, 2012    Daylight 19 hours, 56 minutes

Friday, July 13, 2012

Tiramisu Brownies


My dad is very forgetful, he is the perfect absent minded professor (yes, he was an engineering professor at University of Alaska in Fairbanks).  He is forgetful and he is a master at being lost in thought but still making the "uh huh" sound needed when someone is talking to you and you need to answer, but you really weren't listening...

In the summer, when we came to Alaska, we often went camping.  We had a camper on the back of a pick-up.  The 7 of us kids would ride in the camper (it was legal way back then) and my dad and step-mom would ride in the front.  Kids would get to take turns in the front (and if you got car sick you got extra turns, guess who got car sick.).  We had an intercom and before we would pull out my dad would say over the intercom "Count off."  We each had a number, one for the youngest and up to 7 for the oldest and we would have to yell our number in the direction of the intercom. (My number was 3, the same number of one of the greatest Yankee players of all time)

One trip, we stopped for gas at Curry's Corner.  My dad was pumping the gas, my sister and I told Dad we were going in for some candy was that o.k.?
"Uh huh" he answered.
We skipped in, feeling rich with our fifty cents each and we drooled over the candy selection until we finally decided on how to best spend our big bucks.  We trooped outside, ready to load into the camper for the long drive to where ever it was we were going... and the camper was gone.

Thinking it was a joke we looked around and ran around the corner of the building, no camper.  We went inside, burst into tears and exclaimed that our family had left us!  The poor store owner was stuck with two sticky, crying girls (and this was long before cell phones).  He called the troopers, fed us ice-cream and hoped for a quick return.  Surely someone would miss these two adorable children sooner rather than later.

Well, my dad was happily headed down the road (and apparently had forgotten to have the kids count off) happy as could be, when he ran into some stopped traffic for a motorcycle accident.  One of the troopers walked up to my dad's window.  Dad rolled the window down.
"Are you missing anything, sir?" the trooper asked.
Dad check his wallet for his driver's license; it was there.
"No, I don't think so," he answered.
"I mean are you missing anyone, sir?" the trooper rephrased his question.
Dad called into the intercom, "Count off."
"One." Kary answered
.
.
.
.
My sister was two and I was three so the count off ended right there. 
They turned around and came back to get us.  We were finished with our ice-cream and ready for the ride.  My dad was so upset, I don't know if it was because he left us or he didn't believe us when we told him we had asked for permission.
I don't think he ever forgot to call for a count off again.

While these brownies have nothing to do with that story, I did retell that story to some friends while we ate these the other day.  It makes me laugh to think about now, but back then my sister and I were really upset.  Chocolate is the best thing to feed people who are upset, or forgotten at the gas station.  I found these on the blog A Little Bit of Everything from pinterest.  They are dense, chocolaty, creamy with the Mascarpone cheese and oh, so delicious. 

Tiramisu Brownies
Ingredients
  • 12 oz chocolate chips
  • 1 cup butter, softened
  • 1 cup sugar
  • 4 whole eggs
  • 4 egg whites
  • 1 cup cake flour*
  • 1/4 cup instant coffee granules/powder
  • 16 oz Mascarpone cheese room temperature
  • 1/4 cup sugar
  • 4 egg whites
  • 2 tsp vanilla extract
Instructions
  1. In a large bowl melt the chocolate. Stir until smooth and leave it to cool.
  2. Heat the oven to 350ºF. Line a 13X9 baking pan with paper. I used the foil-parchment paper from Reynolds.
  3. Add it to the mixing bowl with the paddle attachment on. Beat in the butter followed by 1 cup of sugar and the 4 eggs and 4 egg whites.
  4. Add the instant coffee followed by the flour. Mix on low speed until just combined. Pour the batter into the prepared baking pan minus 1 cup of brownie batter.
  5. In another bowl combine the mascarpone cheese with 1/4 cup sugar, 4 egg whites and vanilla extract. Place spoonful of brownie batter on top of the creamy filling and swirl it lightly with a fork. 
  6. Bake for 45-50 minutes or until center is almost set and brownies begin to pull away from sides of pan. Cool completely in the pan before slicing it.
  7. Enjoy!
Notes
If you don't have cake flour you can make your own by placing two tablespoons of cornstarch in a one-cup measure. Fill the rest of the cup with all-purpose flour. Sift together and use it. 

July 13, 2012     Daylight  20 hours,  15 minutes     Current Temp. 64 ºF

Wednesday, July 11, 2012

Strawberry Upside Down Cake

Strawberries, again...I just can't get enough.  I eat so many strawberries this time of year my husband just rolls his eyes when I pull another flat out of the car after a trip to our box store. 
This is a cheater cake...box mix, box of jello, marshmallows and it is so good.  It is rich and moist with the strawberries so sweet on the top (bottom).  You could use your favorite white cake recipe if you are a purist. 
I made this, ate two pieces and took it right to work, where I ate three more pieces.  It is that good.


Strawberry Upside-Down Cake
adapted from this pin I found on Pinterest
1 pint strawberries, cut up
1 6oz. box of strawberry jello (the big box)
3 cups of mini marshmallows (I used a left over bag of bunny marshmallows from Easter)
1 white cake mix, mixed as directed on the package

Preheat oven to 350ºF.

Spray 9X13 pan with cooking spray.  Cut up strawberries and place in bottom of pan.  Covering bottom evenly.  Sprinkle dry gelatin over strawberries, then top with marshmallows.
Mix cake mix as directed on box and spread over marshmallows.  Bake for 40-50 minutes until toothpick comes out clean.
Cool for about 15 minutes.  Run a knife around edge of pan and invert cake onto serving dish (or in my case, a bigger pan, I didn't have a serving dish big enough).

Serve warm or cold with a dollop of whipped cream.

Tips:
I cut the cake and then put it back in the 9x13 inch pan, after I washed it, to store the cake in the fridge and to take it to work. 

I used the bunny shaped marshmallows left over from Easter to use them up.  I used the whole bag (minus the FEW I ate) and it worked just fine.  You could cut up big marshmallows and use those if that is what you had.

This is a very moist cake.  It was a big hit at my office.

July 11  , 2012     Daylight  20 hours, 28 minutes     Current Temp.  58 ºF

Monday, July 9, 2012

Strawberry Pie


Nothing in the world smells or tastes like fresh strawberries.  In February, Fairbanks starts to get strawberries after a couple months of finding them only in the frozen food section.  They smell of promises of spring and warmer weather to come, but they taste like nothing.  Absolutely nothing.  I have trained myself to just smell the berries, enjoy the fragrance, and then walk away.  I'm sure the produce manager is on his radio to the store manager saying "Yea, that crazy lady that smells the berries is here again.  Do you want me to call security?  Wait, she's done and moving to the frozen food section.  I'll keep an eye on her."
My veggie boxes from left to right: radishes, carrots and celery; cauliflower, broccoli and cabbage; strawberries.
In the summer I have a small garden.  Actually, 4 raised boxes to grow a few things.  I had one box just for strawberries.  They looked wonderful.  I watered them, fed them organic fertilizer and patiently waited for those sweet, red berries to ripen.  I couldn't wait to pick those little treasures and pop them into my mouth, the warm sweet-tart juice running down my chin.  I was ready.  The plants grew, they blossomed, the green berries got bigger and bigger...and no red berries.  I couldn't understand it.  I went to the gardening books, I googled, I covered with bird netting.  Still no red berries.

One morning, I took my cup of coffee out to the back deck to sit and enjoy the morning sun.  As I walked out I saw Lobo by the veggies boxes in the yard.  I said his name and he looked up, startled, and DROPPED A RED STRAWBERRY OUT OF HIS MOUTH ON TO THE GROUND.  I couldn't believe it.  The dogs had been eating the ripe strawberries every morning when I let them out.  I was so mad, then started to laugh.  How could you blame them.  I did move the strawberry box to one of the tall boxes, not the one on the ground, and I watch them like a hawk now.  Although last summer Tucker and Lilly ate all my cabbages, but that is another story.
Zucchini and leeks in the low box now, for some reason the dogs don't bother them like they did the strawberries.

Fresh strawberries in the summer when they are so sweet is truly one of life's greatest pleasures.  In this pie the fresh strawberry is the star, and oh, so good.

Ingredients
1 (9 inch) pie crust, baked
4 oz. cream cheese, softened
1 1/4 cup granulated sugar, divided
1 quart fresh strawberries
1 tablespoons cornstarch
1/4 cup water
1/2 cup heavy whipping cream

Bake a pie crust or make a graham cracker pie crust from this recipe.  Cool.
Mix softened cream cheese and 1/4 cup sugar until well combined and smooth.  Spread cream cheese mixture on bottom and slightly up the sides of the crust.

Arrange half of strawberries in baked pastry shell. Mash remaining berries and combine with 1 cup sugar in a medium saucepan. Place saucepan over medium heat and bring to a boil, stirring frequently.
In a small bowl, whisk together cornstarch and water. Gradually stir cornstarch mixture into boiling strawberry mixture. Reduce heat and simmer mixture until thickened, about 10 minutes, stirring constantly. Pour mixture over berries in pastry shell. Chill for several hours before serving. In a small bowl, whip cream until soft peaks form. Serve each slice of pie with a dollop of whipped cream.


Tips:
I asked Jaden to decorate the pie with fresh blueberries.  It was a beautiful red, white and blue pie for the 4th of July's dessert table.

July 9, 2012     Daylight  20 hours,  40 minutes     Current Temp.  54 ºF

Thursday, July 5, 2012

Low Calorie Root Beer Float Pie


 I remember being a kid (yes, I can remember that long back) and getting so excited for dessert (some things never change).  In the summer we would have something cold to counteract the heat. We would drive the 30 minutes to Dodge City to the A&W drive in.  We would order root beer floats.  The car hops would bring the frosty mugs, wet with condensations and the cold root beer-ice cream foam sliding down the side. They would hang the tray on the driver's door and we would wiggle with anticipation as money was exchanged and the floats would get passed to the back seat, one at a time.   The joy of the bubbly root beer and the cold and creamy ice cream was always a special treat.

One year my dad decided he would make root beer.  It was not quite the success he was hoping for.  The root beer was bitter and it didn't matter how cold you got it, you just couldn't choke it down (sorry Dad).

Last year, when Dave and I went to Kansas for my niece's graduation, we found the A&W drive up was long gone (but Sonic and cheesy tator-tots are still there...oh, I digress) but the saloon at Boot Hill still serves sarsaparilla which tastes a lot like A&W root beer (or maybe it is Safeway Select?).
So, when I saw this recipe for Root Beer Float Pie, I brought all these memories flooding back.  It was a good trip down memory lane.  And, this being Pie Summer I thought this was a wonderful recipe to share with you. 

I made this pie, ate a piece and made my husband take the rest of the pie across the street to the little boys.  You know, there are just some foods I can't be trusted with.

According to Calorie Counter, each piece of pie is about 165 calories (that is if I entered everything correctly).  It is cool and creamy, close your eyes and remember the joys of a root beer float on a hot day.

Rootbeer Float Pie
adapted from Healthy Cooking
1 graham cracker pie crust, use this crust or purchase one
1 cup diet root beer
1 package vanilla sugar free instant pudding
1 container fat free cool whip
8 maraschino cherries, optional

Make graham cracker pie crust and cool completely, or open the package for a store bought one (I'm not judging).
Mix 1 cup diet root beer with instant pudding, mix well for 2 minutes, then let sit for 5 minutes until soft set.
Take 1/2 cup cool whip from container and save for later.  Take half of the cool whip that is left and fold it into the pudding mixture.  Pour into crust and smooth top.  Top with remaining cool whip.  Refrigerate for at least 4 hours.
Use saved 1/2 cup of cool whip to decorate the top of the pie.  Top with maraschino cherries if desired.
Makes 8 servings

July 5, 2012     Daylight 21 hours, 3  minutes     Current Temp.  67ºF

Monday, July 2, 2012

Perfect Chocolate Chip Cookies

My baby brother, Cal, lives in Kansas.  They are enjoying temperatures in the +100s.  I am so very jealous.  We grew up in Kansas and once you get used to a summer that is warm (yes, over 100 is warm) you never get over it.  Living in Fairbanks now, the summers are a tad bit cooler.  I could see my breath this morning when I went out to jog. (Yes, June 27 and I could see my breath).  It is kinda crappy.

Last night was so cold, I had to bake just to warm the house up.  I made the perfect chocolate chip cookies.  The recipe came from a new cookbook called Cookies.  No, I don't own enough cookbooks.  The secret ingredient is oatmeal flour.  You make it by grinding old fashioned oatmeal in your food processor (I have a coffee grinder I use just for bread crumbs, flax seeds, herbs and spices and now, oat flour).  These cookies are chewy, nutty and delicious.  The perfect thing to take on a picnic or eat in a hot bath when it is so cold that is the only way you can warm up.  And that is what I did.

The Perfect Chocolate Chip Cookie
adapted from Cookies, Leisure Arts
1 cup butter
1 cup granulated sugar
1 cup firmly packed brown sugar
2 eggs
1 tsp. vanilla extract
2 cups all purpose flour
1 tsp. baking soda
1/2 tsp. salt
2 cups old fashioned oats
2 cups semisweet chocolate chips
1 cup chopped pecans

In a large bowl, cream butter, sugars, eggs and vanilla until fluffy.  In a separate bowl, combine flour, baking soda and salt.  Add to creamed mixture, mixing thoroughly.

Place oats in a blender or food processor and process until the texture of coarse meal.  Stir oats into dough with chocolate chips and pecans.  Scoop into balls with medium scoop (#40).  Freeze for at least 30 minutes.

Pre heat oven to 375ºF.

Take out number of cookie balls you want to bake.  Place on cookie sheet lined with parchment paper.  Let sit on counter while oven pre-heats.  Bake cookies for 12-15 minutes or until lightly browned around the edges.  Cool cookies slightly on baking sheets; transfer to wire racks to cool.

Place any unbaked cookie balls in a freezer plastic bag for future use.  To bake, place frozen balls on lined cookie sheet and let sit on counter while the oven pre-heats.

Yields: about 5 dozen cookies


Tips:
Make sure you cream your butter and sugar well.  The mixture should be lighter in color than when you started mixing and should be light and creamy.

Mix your dry ingredients until well incorporated but no more.  Over mixing the cookie dough changes the texture and the enjoyment of eating your cookies.

I mix my dough, scoop with a #40 scooper all at once and freeze on a parchment lined cookie sheet.  Then I bake a dozen or so at a time (just put on cookie sheet and let sit for 15 minutes before baking).  If I want to bake all of them that day, I mix, scoop, refrigerate for at least 30 minutes then bake.

July 2, 2012     Daylight  21 hours,  18 minutes     Current Temp. 62ºF