Showing posts with label cheese. Show all posts

Monday, November 9, 2020

Instant Pot Pumpkin Cheesecake


The winter turned cold.  It was -25°F here last week and the old dog had a hard time getting back into the house after his morning run to the dog yard.  I'm so glad we have indoor plumbing. Then it warmed up by 40 degrees and dumped snow.  We spent the whole weekend moving snow.  I didn't get the bathroom painted like I wanted and I didn't get all the Christmas decorations up like I planned, but we moved about a ton of snow, and expect more this week.

I have started testing some new recipes for our Holiday week when the grandsons and their people come to visit in November.  They are coming for the whole week before Thanksgiving and I am taking that week off work to play with those boys.  I've got plans for the naughty dinosaurs, decorating cookies, making caramel corn and we will have a taffy pull!  I'm a little excited.

One of the recipes I've tested is pumpkin layer cheesecake.  It cooks in the Instant Pot, comes together quickly and is so delicious!  I might have to test it again before the kids come.


Pumpkin Layer Cheesecake

For the crust:

  • 1.5 cups almond flour
  • 4 Tbsp. butter, melted
  • 1 Tbsp. brown sugar substitute
  • 1/2 tsp. pumpkin pie spice 

For the cheesecake:

  • 16 oz. cream cheese, room temp.
  • 1/2 cup granulated erythritol
  • 2 eggs
  • 1/4 cup pumpkin puree
  • 3 Tbsp. sugar free caramel syrup
  • 1 tsp. vanilla extract
  • 1/4 tsp. pumpkin pie spice
  • 1.5 cups of water for the Instant Pot

Make the crust:  In a medium bowl, combine the almond flour, butter, brown sugar substitute and pumpkin pie spice.  Mix until it resembles wet sand.  

Spray a 7" springform pan with cooking spray, line bottom with parchment paper. Press the crust evenly into the pan and work it half way up the side of the pan. Place the pan in the freezer while you mix the cheesecake batter.

In a large bowl, using a hand mixer on medium speed (I use my stand mixer), combine the cream cheese and erythritol until light and fluffy, 2-3 minutes.  Add eggs caramel syrup, vanilla and pumpkin pie spice.  Beat until well combined.

Remove 1 cup of cheesecake batter to a small bowl.  Mix in the pumpkin puree.  

Remove the crust from the freezer and pour in the pumpkin cheesecake mix, smoothing the top.  Add the rest of the cheesecake over the top, smoothing the top.  Cover top with aluminum foil.

Add the water to the Instant Pot and lower the trivet into the pot.  Carefully place the cheesecake on the trivet in the Instant Pot.

Close lid and seal the vent.  Cook on high pressure for 45 minutes.  Once it is finished, wait 10 minutes then quick release the steam.  

Remove the trivet and cheesecake from the pot.  Remove the foil from the top of the pan and let cool for 30 minutes.  Cover with cling wrap and place in refrigerator for at least 8 hours.

To serve; remove from refrigerator and let sit at room temp. for 30 minutes.  Remove ring of the springform pan, cut and serve.  Passing whipped cream and/or caramel sauce on the side.


November 9, 2020  Sunrise 9:08 am  Sunset 4:00 pm  Temp H 27/ L 19°F

Wednesday, August 19, 2020

Cauliflower "Mac" and Cheese and Putting up the Garden


I'm not a big gardener, I plant just enough to make me feel like a gardener.  I have 4 raised beds I use to grow some veggies and I like lots of flowers.

This year I planted 12 cauliflower plants, 6 of broccoli, 6 cabbages, 2 eggplant (for the first time), Swiss chard, lettuce, radishes, 4 green zucchini and 2 yellow squash, 2 cucumber plants and the tomatoes in the greenhouse.

Now, this year it rained a lot, so watering was pretty easy...I didn't have to do it much, which is a good thing because my dad isn't here to water for me.  But the problem with my garden is that everything is ready at the same time! I put harvesting off as long as possible (you can see in the picture below, one of my cauliflowers started to spread), but I finally had to deal with all that broccoli and cauliflower.

Freezing broccoli and cauliflower doesn't take a lot of work, just be organized and follow the steps.

Why does it all have to be ready at the same time?
Freezing Cauliflower and Broccoli

1) Cut cauliflower (and Broccoli) from garden, bring inside and wash.

2) Place large stock 2/3 full of water on stove and heat to a roiling boil.

3) While water is heating, cut cauliflower into desired sized florets.

4) Set up ice bath in sink, cold water and lots of ice (in Fairbanks we can skip the ice, our water comes out of the tap that cold)

5) Place several layers of towels on a table or big counter.

6) Once water is boiling, generously salt the water (this is optional)

7) Place about 4-6 cups of florets in the boiling water and set timer for 5 minutes for cauliflower or 3 minutes for broccoli.

8) When the time beeps, remove the florets from the boiling water (I use a big skimmer) and place in the ice bath until all the florets are cold. While one batch of florets are cooling, I start another batch in the boiling water.

9) Once the florets are cold, remove them from the ice bath to a colander to drain.

10) Once drained, tip them onto the layers of towels to dry further. I use a towel to GENTLY dry the tops, you don't want squished florets.

11) Place dried florets in sheet pans lined with parchment and freeze.

12) Once frozen transfer florets to ziplock bags and return to freezer until needed.
Blanched, dried and frozen for packaging.
I got some giant broccoli too.
Blanched broccoli drying, almost ready for the freezer.

So that is the way I blanched and froze 9 gallon bags of cauliflower and 3 gallon bags of broccoli.  The nice thing about freezing the florets this way is the florets don't freeze together and you can take out as much as you want and return the rest of the bag to the freezer.

But 9 gallons of cauliflower is a lot for Dave and me so I need to get a little creative in ways to fix it so Dave doesn't get too tired of it.  He loves mac and cheese, so I decided to give the "cauli and cheese" a try.  It was a hit! He even ate left-overs for lunch the next day.  


Cauliflower and Cheese

1 med. head cauliflower
1/2 cup heavy whipping cream, or use 1/4 c. cream and 1/4 c. almond milk or water
3 oz. cream cheese
1 tsp. onion powder
1 tsp. garlic powder
1 cup shredded sharp cheddar cheese
1/2 cup shredded mozzarella cheese
1/2 cup grated parmesan cheese, divided
1/4 cup ground pork rinds, or pork panko

Preheat oven to 350°.  Line a baking sheet with parchment paper, spray a baking dish with cooking spray or butter.

Wash the cauliflower and break into small florets.  Place on prepared baking sheet and bake for 15 minutes.  

Meanwhile, make sauce. In a medium saucepan or a microwave safe bowl, mix whipping cream, cream cheese, onion powder, garlic powder, cheddar, mozzarella and 1/4 cup grated parmesan cheese.  Heat until melted and completely mixed and smooth.  
Gently mix cauliflower into the cheese sauce and pour into prepared baking dish.  
Mix remaining 1/4 cup parmesan and the ground pork rinds and sprinkle over the top of the cauliflower.  Bake for 20-30 minutes until golden on top and bubbly.  


1 year ago:    Birthday Cupcakes and Learning to Decorate
3 years ago:   Layered Panna Cotta and Dave's New Puppy
5 years ago:   Tazlina Wedding
7 years ago:   Lemon Bars

August 19, 2020   Sunrise 5:52 am  Sunset 9:53 pm  Temp. H 72/L 50°F

Thursday, June 18, 2020

I'm feeling very busy, like I have a lot to do. Work is busier than ever, the co-workers are always needing out or in or water, the house still gets dirty (I tried to make the rule 'No shedding in the house, but it didn't work. My coworkers are so inconsiderate) and needs to be cleaned, the yard always needs water or weeding or feeding...it just goes on and on, and most of the evenings are spent working on the truck (exciting update soon).

So, one of the things I do because I'm lazy to save time, is to step over the small gate we have in the back that is usually closed to keep the dogs off the grass. A couple weeks ago my pant leg got caught on one of the top posts, my hands were full and I fell, tearing my pants. I was lucky I wasn't really hurt (except my pride) and the neighbors were not on their deck so no one saw me. I vowed to myself to be more careful. 

Well, yesterday I was at it again. My hands were full and instead of unlatching the fence, I stepped over it, the leg of my capri pants caught and I fell. Again, I was lucky and nothing was really hurt, except my pride, and the neighbors were not on their deck so no one saw me. But, a couple days later Dave looks down at my leg and sees the giant purple bruise and says, "When did you fall over the fence again?"

So now my vow to myself is to unlatch the fence and not step over it any more, even if my hands are full. I will simply put down what I am holding and unlatch it. I figure I am pushing my luck with no injuries from these falls. (I have a good friend who fell walking her new puppy, broke her wrist and had to get a plate put in it. I don't want to do that.)

Well, to sooth myself, I made one of my favorite dinners, meatloaf. I do it a little differently every time. This time I spread the meatloaf mixture out into a rectangle, spread some garlic herb soft cheese all over it and rolled it up. Then I topped it with bacon and baked it.  Meatloaf will always cure what ales you.


Rolled Bacon Meatloaf

1 lb. ground beef
1 egg
1/2 cup ground pork rinds
salt and pepper
1/4 tsp. garlic powder
1/4 tsp. onion salt
2 oz. (about 1/2 container) garlic-herb goat cheese, softened
6-8 strips bacon

Mix beef, egg, ground pork rinds,salt and pepper, garlic and onion salt.  Spread into rectangle (about 9x12), being careful not to press the meat too much.  Spread cheese over the top, leaving about 1/2 inch edge free of cheese so press roll closed.  Starting on the long end, roll the meat into a gentle-but-tight roll.  Pinch edges closed so cheese doesn't leak out during baking.  Lay bacon strips, side by side, on a cutting board.  Carefully move meatloaf onto bacon and wrap bacon around the loaf.  Transfer to a loaf pan, seam side down, and bake at 350°F for 45-55 minutes. Remove from oven and let rest for 10 minutes, remove from pan and cut along edge of each slice of bacon.

June 18, 2020  Sunset 12:46 am  Sunrise 2:58 am  Temp. H 73/ L 55°F

Thursday, April 2, 2020

Chicken Parmigiana

Dave and I are adjusting to working from home.  Things are getting a little quiet for him and he has some time on his hands.  I have plenty to do so I am working away in my office.  Every once in a while he'll stop by my door with a joke or a funny picture.  He'll want to visit a bit as he heads to the employee bathroom down the hall from my office, or he'll bring me a cup of tea. 
I had a peeping Tom one morning.

Yesterday, the project he was going to work on fell through because he needed to get some missing materials, and you know, no shopping.  I think he was a little bored.  He came to get me in the middle of the afternoon and made me go outside for some vitamin D because it fights that virus.  Then, after a snack and I went back to work, he called me on my cell phone.  He was on the back deck texting one of our kids and asked me to go to Amazon and find a specific item for him.  I told him I could do that when I got off work, but I was busy at that moment.  Then he says, "o.k. I'll see you when I get home from work." I laughed through the last hour of my workday.

Well, my commute home from work is pretty short these days.  You would think I would spend that extra time on dinner or something, but no.  I've been parked in front of the news every evening and then I rush to get dinner on the table.  This is a quick, delicious keto dinner.  I use pork dust instead of flour for the coating.  You can buy it now, it's called Pork Panko but I just make my own.  That evening we watched the news, dinner was delicious,  and it is so fast I even had time to do that shopping on Amazon for him.


Chicken Parmigiana

2 chicken breasts
1 egg
2 Tbsp. coconut flour
1/2 cup ground pork rinds
1/2 cup grated parmesan cheese
salt and pepper
2 Tbsp. avocado oil, or oil of choice to sauté chicken
1 cup sugar free marinara sauce
1/2 cup grated mozzarella cheese
4 tsp. shredded parmesan cheese

Slice chicken breasts horizontally into two pieces each, making 4 pieces total. Gently pound each piece of chicken into an evenly thick cutlet. Salt and pepper each cutlet.

Make breading station using three large bowls or pie plates.
place coconut flour in one bowl
beat egg with 1 Tbsp. water in one bowl
mix grated parmesan cheese and pork rinds in a bowl

Starting with the coconut flour, then egg wash, then cheese mixture, bread each cutlet and set set aside.

In a heavy bottomed sauté pan or cast iron pan, heat oil to medium-high.  Once the oil is hot, carefully place the cutlets into the pan and cook, about 3-5 minutes per side, depending on thickness.  Remove from heat onto a paper towel lined plate.

Heat marinara sauce in a small saucepan. 

To serve, place one cutlet on a plate, cover with 1/4 cup marinara sauce and 2 Tbsp. of mozzarella cheese and 1 tsp. parmesan cheese
Makes 4 servings

1 year ago:     Brownie Bark for a Road Trip
5 years ago:   Flank Steak with Grilled Apricots
7 years ago:   Beer Marinated Pork Roast

April 2, 2020  Sunrise 7:01 am  Sunset 8:49 pm  Temp. H 33/ L 19°F


Friday, March 20, 2020

Working from Home and Lemon Cheesecake with Strawberry Jam Swirl


We have been encouraged to work from home, if possible.  Well, I have been encouraged and Dave's office closed and they were told to work from home.  So, Dave and I are both working from home.  This is totally new to us and a challenge.  I have never had a job that you can do from home, until now, and with all my spring travel cancelled, all my work can be done from my laptop.  Because I have a couple of conditions that put me in a higher risk group for complications from COVID-19, I am trying to be careful and Dave is really trying to be careful with me, and really wanting to limit my trips outside the house.

A colleague sent me a list of things to think about when you have to work from home that was very helpful:

Make work time work time; Work and home are not places but states of mind. Set a schedule for work and for when work is done. Maybe make a habit of shutting down the computer when you’re done with work to help make the separation actionable.

Routines: People respond to routines and routines help build structure. You can build the rules and structure to fit your life. For example, choose a starting time and be working at the same time every day. It helps give you a sense of control. Equally important is to set an end time and ‘clock out’, do something to signify the end of work. Shut down the computer, close a door, etc.

Rules, If you live with other people it's important to establish communication rules between you and the other folks in your home. Interruptions will break your focus, but if everyone understands the rules for working at home it will have everyone on the same page of when are and are not available. For example if the door is shut others know to text or email before entering. Obviously it’s important to explain these rules to others in your house. Communication about rules doesn't really work with little kids but it would be wonderful if it did. 

Ergonomics: Take the time to prepare a comfortable work environment. Proper ergonomics are important, and you’ll get uncomfortable quickly if your desk is at a bad height/angle.

Sound: I usually use headphones and listen to music without words to help focus on work. Movie soundtracks or the genre lo-fi hip-hop are especially helpful.

Workspace: If you can, have a workspace that is different than your usual living space, even if it’s a folding table set to a side of a room or moving your chair in a unique position, it helps to differentiate workspace from home space.

Virtual social interaction; use Samepage as watercooler to jump into and out of a quick conversation. Set up Zoom chats with your colleagues, etc 


Breaks: Take the occasional break, just as in the office it’s helpful to take a walk outside, and move around during the day. If you usually  walk around campus during lunch, keep that routine. Take a lunch break away from your desk.

But, Dave and I made it about 35 minutes yesterday before we had to sit down and have a work meeting to set up some ground rules.  I sure hope we make it through this work from home thing without any casualties!  All kidding aside, we are used to being apart for most of the spring, not working from the same room all day, every day so we are working on this. 

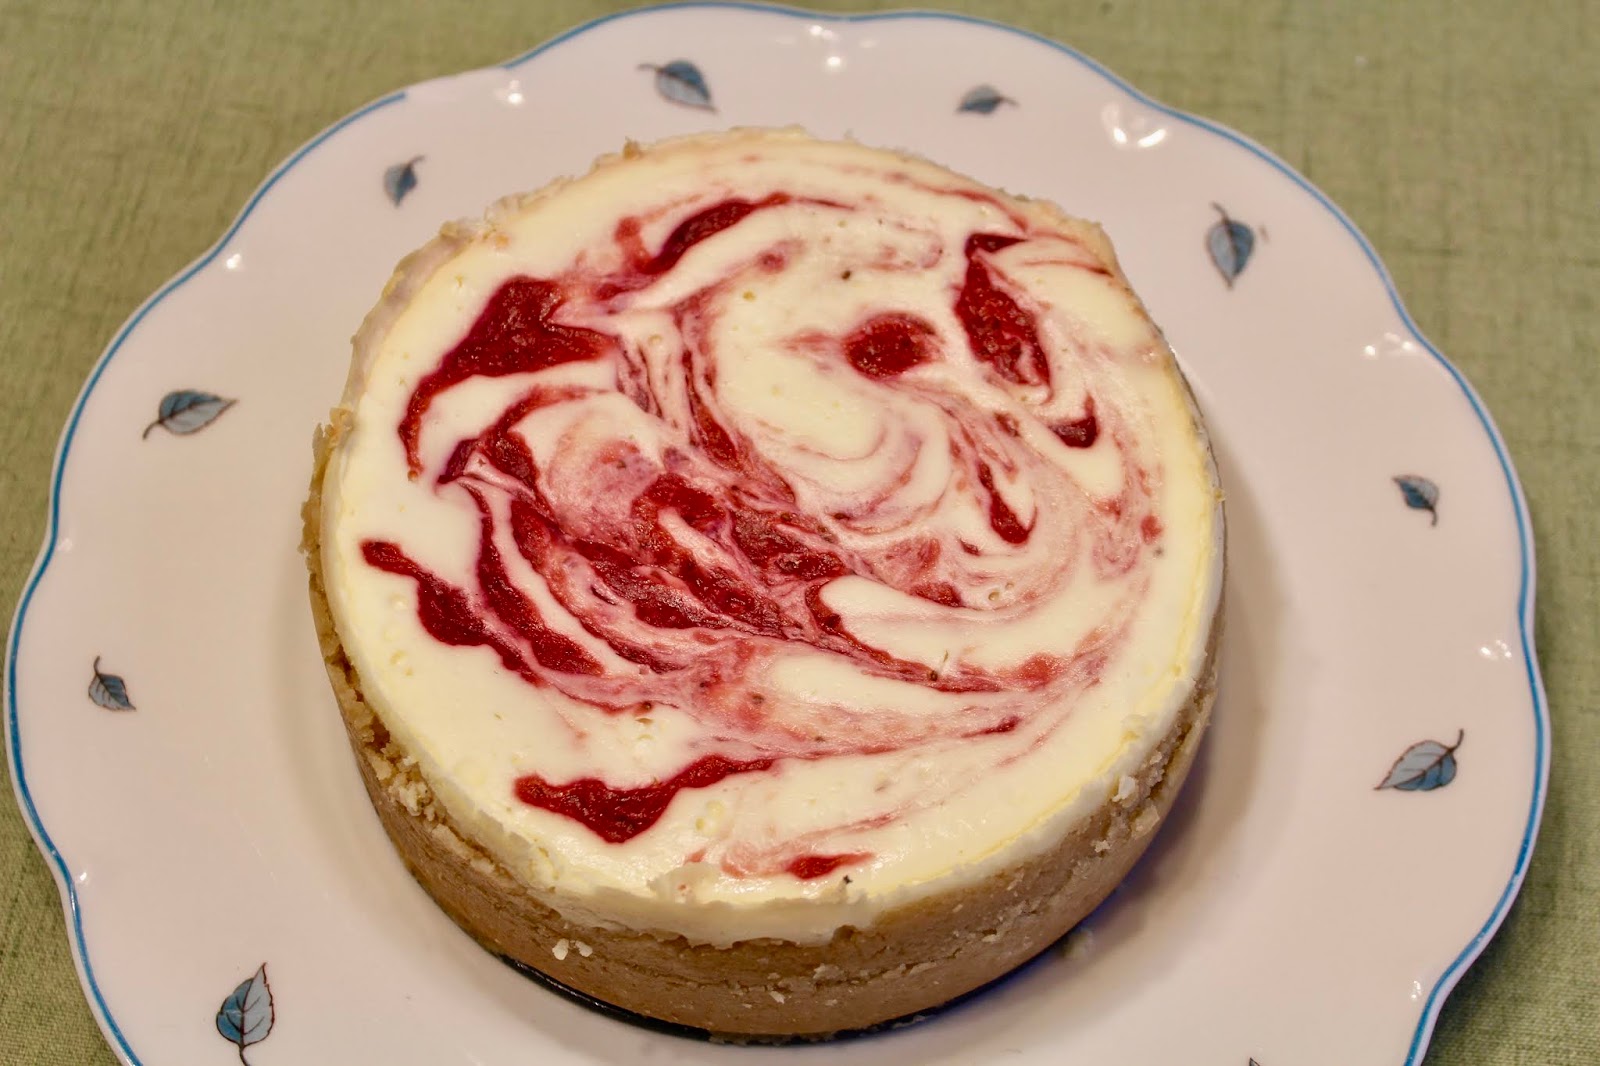
I made this cheesecake to use some of my strawberry jam.  It is a lemony, sweet and creamy treat.  If you don't like lemon as much as I do you can omit it and use vanilla extract instead of the lemon extract.  I'm really going to need lots of treats to get through this. 

So friends, stay safe, wash your hands and be flexible! 

Lemon Cheesecake with Strawberry Swirl

For Crust:
1 1/2 cups almond flour
4 Tbsp. butter, melter
2 Tbsp. granulated Swerve, or sweetener of choice

For Filling:
16 oz. cream cheese, softened
1/2 cup granulated Swerve, or sweetener of choice
2 eggs,
1 tsp. vanilla extract
1/2 tsp. lemon extract
1 tsp. lemon zest, optional
1/4-1/2 cup strawberry jam, I used my homemade jam

Spray a 7" springform pan with cooking spray and line the bottom with parchment paper. 

In a medium bowl, mix almond flour, butter and Swerve, mixture should resemble damp sand.  Press on bottom and 1/2 way up sides of prepared pan.  Set in freezer while you make the filling.

In a large bowl or stand mixer combine cream cheese and sweetener on medium speed until cream cheese is light and fluffy.  Add eggs, vanilla, lemon extract and lemon zest (if using).  Mix well. 

Remove crust from freezer and pour in the filling.  Drop spoons-full of jam over the top and swirl with the blade of a butter knife or off-set spatula.  Cover tightly with aluminum foil and place it on the trivet.  Pour 1 1/2 cups of water into the instant pot and carefully place trivet and cheesecake into pot.  Close the top and seal the vent.  Cook on HIGH pressure for 45 minutes.  Let steam vent naturally for 5 minutes then quick release.


Remove trivet and cheesecake from pot, remove foil carefully and let cool on counter for about 30 minutes.  Center may be a little jiggly but will firm up as it cools.  Carefully run a sharp knife around edge to release from the pan, place in refrigerator for 6-8 hours.  To remove sides, run a sharp knife around edge again and remove ring.  Slice and serve with more jam for topping.
Makes 12 servings

1 year ago:     Keto Bacon Jam
7 years ago:    Parmesan Tilapia and Hippos

March 20, 2020  Sunrise 7:48 am  Sunset 8:09 pm  Temp. H 35/ L 23˚F

Thursday, March 5, 2020

Garlic "Bread" Chaffles


So, I've jumped on the chaffle band wagon.  I've been saving Pinterest chaffle recipes for a while now and I finally bought a tiny waffle maker and have started experimenting with it.  Other than the fact that the waffles are tiny (but the perfect size for a bread replacement) and each take about 4 minutes to cook, it has been a fun thing to try.

I made these chaffles for cheesy bread to have with some beef tips I cooked in the Instant Pot.  In full disclosure, Dave thought they were a little eggy.  I didn't think so, but I haven't had real bread for a couple years now.

This recipe made 8 chaffles, I covered 4 in cheese and broiled them for dinner and we'll have the other 4 as little pizzas later this week.  I'm hoping the tomato sauce, pepperoni and cheese make them taste less eggy for Dave.

They do take a bit for cooking, I did see a 4 burner chaffle maker you can buy, but I just do other things around the kitchen while they cook so it wasn't a big deal for me. I've enjoyed the savory chaffles, now I'm looking for some sweet options.  Do you have a favorite?
Add a layer of cheese, I used a cheddar and jack mix,

top with batter,

cook until nicely browned.

The cheese side is crispy.

For garlic bread, I added cheese and garlic powder on top
and broiled until melty and browned


Garlic Bread Chaffles
4 oz. cream cheese, softened
4 eggs
4 Tbsp. almond flour
1/2 tsp. garlic powder
shredded cheese

Heat your mini waffle maker according to manufacture's directions.
Mix cream cheese, eggs, almond flour and garlic powder.
Sprinkle bottom of waffle iron with shredded cheese.  Pour about 3 Tbsp. of mix onto waffle iron and close top.  Cook until waffle is cooked through.
Makes 8 mini waffles

1 year ago:    Keto Pigs in a Blanket
7 years ago:  Melting Snow and Maple Mustard Chicken Thighs

March 5, 2020  Sunrise 7:43 am  Sunset 6:42 pm  Temp H -5/ L -25

Tuesday, March 3, 2020

Chili Relleno Soup


It is still really cold in Fairbanks.  We have been eating dinner and sticking downstairs next to the fire for the evening.  I'm not getting anything done, but I have learned the joy of binging on Netflix!

One food item Dave really enjoys is chili rellenos.  He orders them every time we go out for Mexican food (about once a week).  I thought with all this cold weather, a warm bowl of chili relleno soup would be the perfect thing to eat while we catch up on Picard or Longmire (we missed a couple while we were on vacation).

And, I roasted the peppers under the broiler-a little extra heat in the kitchen is always a good thing this cold time of year!

Now, Dave doesn't believe that soup is a meal, so we had ours as a first course with our dinner. But if you like soup for lunch or dinner you can always add shredded chicken, ground beef or pork tinga to make this a filling meal.  Enjoy.
Roast the peppers under the broiler until the skins turn black
and start to blister.  Turn the peppers often.

Put the peppers in a bag and let them steam
for about 5 minutes before you peel them.


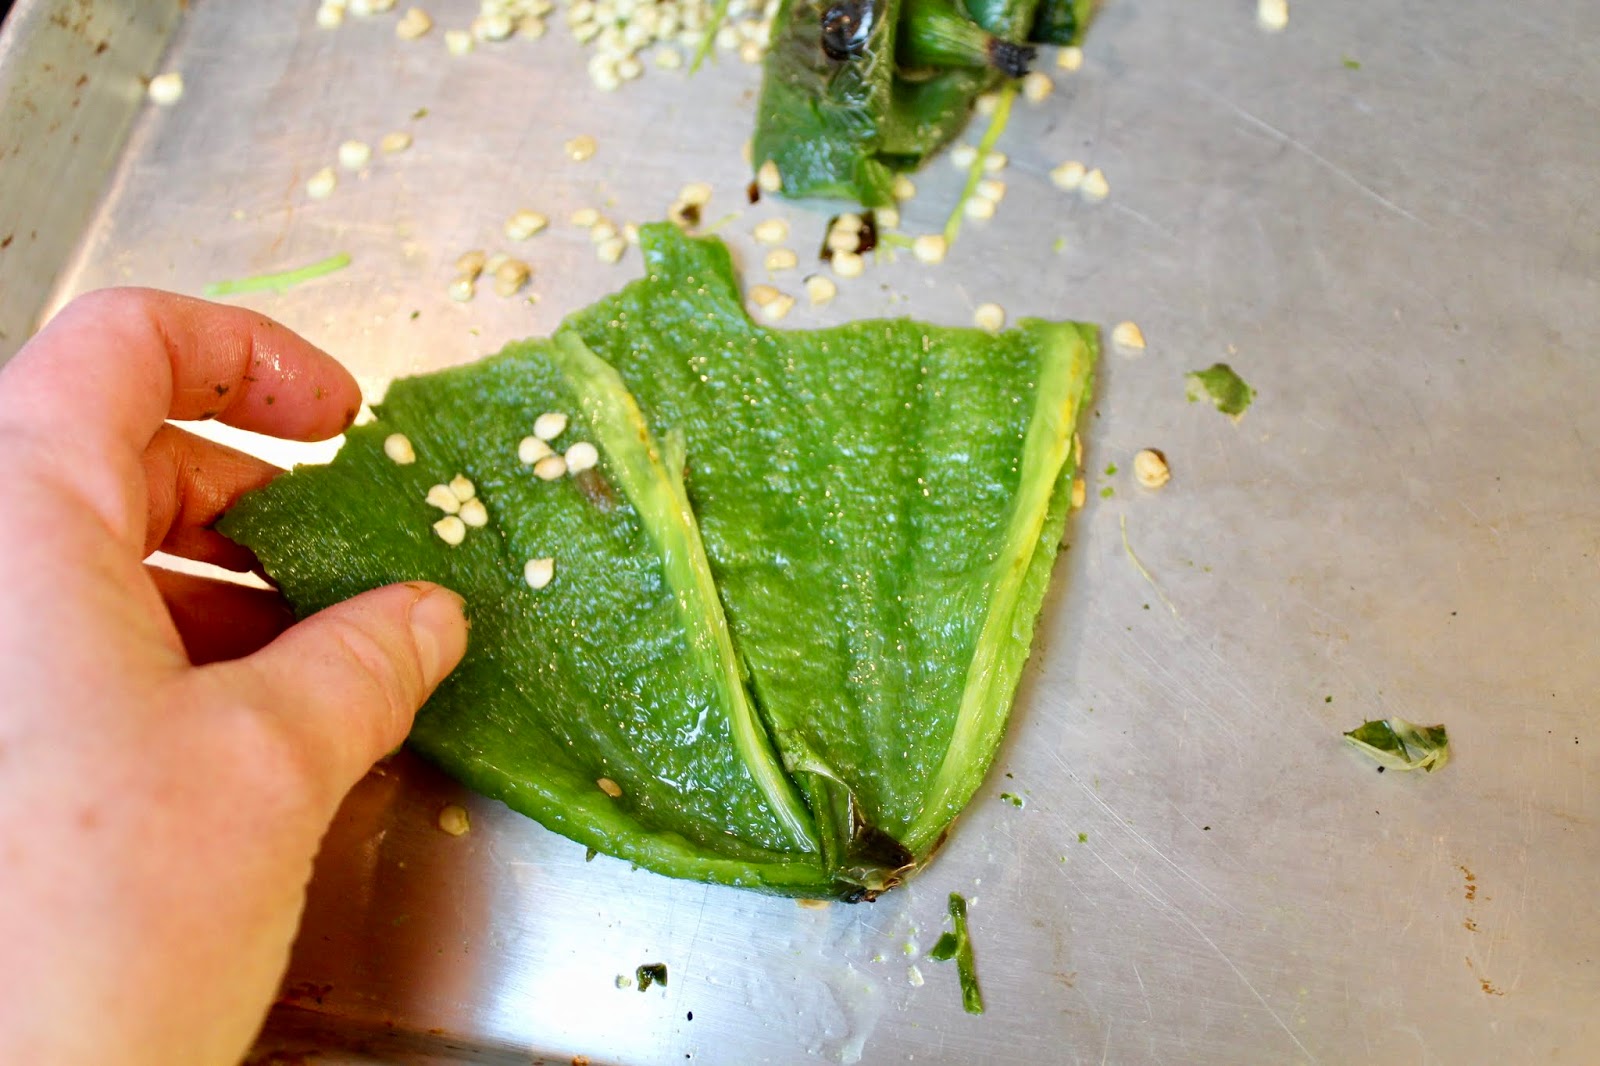
Peeling should be very easy.

I like to scrape the skins off with a spoon.

Cut off the top stem, open them up and scrape out the
seeds and the ribs.

To finish, top with some sharp cheddar cheese and enjoy.

Chili Relleno Soup
5 poblano peppers
2 Tbsp. butter
1/2 onion, about 1/2 cup
2 cloves garlic, minced
1 tsp. cumin
1 tsp. oregano
4 cups chicken bone broth or stock
8 oz. cream cheese, cut in cubes
3 cups sharp cheddar cheese, plus some for topping

Roast peppers under broiler until skins begin to blister and turn black, turning often to char all sides.  Place in a paper bag and close for 5 minutes to let peppers steam.  Remove skin, seeds and ribs then chop finely.

In a medium saucepan, melt butter and saute onion until translucent.  Add garlic, cumin and oregano stirring constantly for 1 minute.  Add chicken broth and peppers.  Bring to a boil, reduce to simmer.  Add cream cheese and cheddar cheese, stir until melted.  To serve top with a sprinkle of cheddar cheese.
Makes 6-8 servings

1 year ago:    Florida Vacation
7 years ago:  Prime Rib

March 3, 2020  Sunrise 7:50 am  Sunset 6:15 pm  Temp. H -2/ L-23°F


Wednesday, December 11, 2019

Keto Hot Pockets


Monday nights are for football and soup and sandwiches.  Dave doesn't think soup is dinner so I add a sandwich to it and we have a casual dinner in front of the tv while we watch the Monday night game. And then I have left-over soup for lunch for the week.  We all win!

I hate the tv being on during dinner, but this is one exception I have compromised on, especially now that the kids are gone. My mom and dad listen to books on tape during their lunch.  I never understood why they would do that but I totally get it now, there just isn't that much new in my daily life, now that the kids are gone, and silent dinner isn't so fun.

This sandwich is like a hot pocket.  You could use regular dough like I do for stromboli, but I don't eat that anymore and for just Dave and I, I am only going to make one dough.  I use a fathead dough with coconut flour, roll it out and fill it with all kinds of things.  This week it was ham and some melty provolone cheese.  I paired it with a deconstructed cabbage roll soup and we had dinner.

Keto Ham and Cheese Hot Pocket

for the fat head dough:
1.5 cups shredded mozzarella cheese
2 oz. cream cheese
1 large egg, beaten
1/3 cup coconut flour
1/4 tsp. baking powder

to make hot pockets
1/4 cup spicy mustard
6 oz. lunchmeat of choice
4 slices cheese of choice

Preheat oven to 425°F.

In a microwave safe bowl, melt mozzarella and cream cheese until easily mixed.  Add egg, coconut flour and baking powder, kneed together until well incorporated.  Between two pieces of parchment paper, roll dough out to about 1/4 inch thick.  Cut into 4 rectangles.

Spread mustard on 1/2 of each rectangle, dividing 1/4 cup evenly between the 4 rectangles.  Place 1/4 of the lunchmeat and cheese on each rectangle, dividing evenly.  Fold into rectangle and seal edges.  Place on parchment lined baking sheet and bake for 12-15 minutes until dough is golden brown.
Serves 4


Deconstructed Cabbage Roll Soup

2 stalks celery, diced
1/2 onion, diced
2 Tbsp. butter
3 cloves garlic
1/2 medium head cabbage, chopped
1 lb. sausage, I like spicy sausage for this
1 15oz. can fire roasted tomatoes
1 tsp. Italian seasoning
4 cups beef bone broth

In a medium stock pot melt butter and sauté celery and onion until onion is soft and translucent.  Add garlic and stir for 1 minute. Add sausage and brown, breaking up big clumps, about 6-8 minutes.  Add cabbage, tomatoes, Italian seasoning and bone broth.  Bring to a boil, reduce heat and simmer for 15-20 minutes.  Serves 4.

3 years ago:  Apple Fritter Bread and Feeling Ashamed of Myself
5 years ago:  Christmas Lists and Rice Krispy Treats
7 years ago:  Coquito, Drink of the Week

December 11, 2019  Sunrise 10:40 am  Sunset 2:45 pm  Temp. H 14/ L 8°F


Friday, August 30, 2019

The New Family Member and Keto Fried Cheese Sticks


We have a new family member I'd like to introduce you to.  He is rather quiet and really low maintenance and we have named him Charles.  Dave wanted to name him Charlie but that was not dignified enough for him, so Charles it is.

It all started when we were at the greenhouse picking up flowers for the garden.  I mentioned I wanted a new flowering tree to take the place of the chokecherry we had to cut down last summer.  Our front yard is just grass now and I miss the spring blossoms.  I walked over and looked at the flowering crab apples and decided I wanted one.  Well, we were out of room in the truck and the tree was $150, so I figured I could think about it for a while.

That Saturday, I met a friend for coffee and she mentioned the Conservation tree sale that was going on that day.  We headed over there to see if they had a flowering crab apple for me.  We stood in line for a good 20 minutes (we were a little early and the line was already 20 people deep).  I figured with so many people there it must be a really good tree sale, and it was!  My flowering crab apple cost me $5!  Yes, only $5.  Dave would be so proud of me for saving him so much money.

Well, it was my turn and I asked for my tree and out came my 5 inch stick with a whole bunch of roots.  Yes, 5 inches and not a single leaf on it.  I looked at that little stick and just laughed.  My friend gave me planting advice and off I went home to plant my little tree.

Dave came home and asked me why I stuck a dead stick in the middle of the front lawn.  I told him how much money I saved him and he just laughed.  He said it looked worse than Charlie Brown's Christmas tree and we should name him Charlie.  But I knew great things were in store for this little stick and named him Charles, a distinguished  name for a (soon to be) distinguished tree.

Charles has been in the ground all summer now.  He has grown some leaves and looks to be thriving.  I talk to him everyday when I water and tell him "good morning, have a good day" every morning when I get in my car to go to work.  Charles is off to great things.
Charles with Gman and the Seatlle DIL the first week of July.

To celebrate the beautiful leaves Charles has grown, I made keto cheese sticks.  I love those fried mozzarella sticks most restaurants have on their appetizer menu.  I made my keto friendly and safe for my tummy.  I made a big batch and keep them in the freezer so I can pull out a couple and have an appetizer any time I want.  They work equally well in the air fryer or fried in hot oil.
Cooking in the airfryer makes them leak a little.

Here's to you Charles, keep growing those leaves and I'll eat my fried cheese sticks and watch!

Keto Mozzarella Sticks

12 mozzarella sticks or string cheese sticks, cut in half making 24 cheese sticks
1/2 cup grated parmesan cheese
1/2 cup crushed pork rinds, or pork dust
1 Tbsp. Italian seasoning
1 tsp. granulated garlic
3 Tbsp. coconut flour
3 eggs, beaten

Oil for frying, or cooking spray if cooking in air fryer

Mix grated parmesan cheese, crushed pork rinds, Italian seasoning and garlic in a small bowl.  Beat the eggs in a second bowl, place coconut flour in a third bowl.  Line a baking sheet with parchment.

Dip each cheese stick in coconut flour, then egg, then cheese/pork rind breading, pressing to make breading stick.  Place coated cheese stick on baking sheet.  Repeat with all the cheese sticks.

Repeat the egg and pork dust breading steps with each cheese stick a second time.  This is important so the cheese doesn't melt and ooze out during the cooking process.  Once all cheese sticks are coated well the second time, place in freezer about 5 hours or overnight (I just make a bunch, freeze and transfer to a sturdy container for whenever).

To cook cheese sticks in oil:
Heat about 2 inches of oil in a heavy pan to 350°F.  Place 3 or 4  frozen cheese sticks at a time in hot oil and let cook about 3-4 minutes or until coating is a golden brown, turn and cook second side for about 3-4 minutes or until golden brown.  Remove from oil and drain on paper towels. Repeat with more cheese sticks, as desired.

To cook cheese sticks in air fryer:
Heat air fryer to 400°F.  Place frozen cheese sticks in air fryer and spray lightly with cooking spray. Cook for about 5 minutes, turn and cook 2-3 more minutes or until coating is golden brown.  Cooking these in the airfryer does cause some leakage...don't worry they are still delicious and you get to eat the leaked out cheese, yum!

 Serve with sugar free marinara for dipping.

5 years ago:  Poached Eggs in Spicy Tomato Sauce
7 years ago:  Salmon Cakes

August 30, 2019  Sunrise 6:24 am  Sunset 9:16 pm  Temp H 68/ L 47°F


Friday, August 9, 2019

Easy Chicken Cordon Bleu and the Toe Issue


I'm not saying my husband deserved this, but he has been telling everyone since I had foot surgery this year he was off the hook...not so much.

About a week ago, Dave woke up with such a pain in his foot he couldn't walk.  Well, not really his foot but his big toe.  He thought he had sprained it or hurt it somehow while he was working on the truck but he couldn't think of a time that he would have hit it hard enough for it to hurt this much.  He was talking to my dad and my dad said it sounded like gout.  Dave googled it and talked to a friend and sure enough it did sound like gout.  Dave called my foot dr. and piggy backed on to my next appointment a bit more than a week away.  He iced, ate tart cherries and tried to stay off it as much as possible.

Well, we went to the foot dr. and sure enough, the diagnosis was confirmed.  Dave was given a couple of options, no red meat, no beer, no shrimp and some meds to get this episode under control or cut back on red meat, beer and shrimp and some meds to get this under control then some meds to prevent this from happening again.  Guess which one he chose (I actually laughed out loud at the doc when he said Dave had to stop eating red meat and drinking beer).

So, while I have always tried to get him to eat more chicken and fish he is now more on board with it than before.  And while he won't be giving his red meat and beer up, he did decide he would cut back.

I made this chicken dish trying to get him to happily eat chicken, I'm always trying.
I love the purple cauliflower

Easy Chicken Cordon Bleu

2 chicken breasts
8 slices deli ham
4 slices Swiss cheese
2 Tbsp. dijon mustard
salt and pepper
1/2 cup crushed pork rinds
1/4 cup grated parmesan
1 egg

Preheat oven to 350°F.  Line a baking sheet with parchment.

Make breading station by whisking egg with 1 Tbsp. water in a small bowl and mixing pork rinds and parmesan in a second small bowl, set aside.

Slice chicken breasts horizontally and lightly pound each cutlet to make an even thickness.  Sprinkle salt and pepper over each cutlet, spread mustard on each cutlet.  Lay 2 pieces of ham and 1 piece of cheese on each cutlet, roll starting with the thinnest side and secure with a toothpick.  Dip chicken roll in egg and then into the pork rind/parmesan breading.  Place on cookie sheet.  Repeat with the other three chicken rolls.
Bake for 30 minutes.  Remove toothpicks and serve.

1 year ago:    Blueberry Picking and Blueberry Crumble
3 years ago:  Introducing Grayson Zachary and the Beginning of the Grandma Adventure
5 years ago:  Chicken with Mushroom and Almonds and the Prank

August 9, 2019  Sunrise 5:17 am  sunset 10:32pm  Temp. H 70/ L 50°F


Two of my favorite boys, in July.


Thursday, August 1, 2019

Keto Cheesecake for My 2 Year Anniversary


I just had my 2 year cancer-free anniversary.  I celebrated with cheesecake!  I love cheesecake and luckily, keto offers lots of options.  I made a simple New York style cheesecake with some lemon zest and then I could have what ever I wanted on top, like this blueberry sauce or some rhubarb sauce I make with a keto safe sweetener.

I don't know why people are afraid of making a cheesecake, they really are easy.  You just mix up all the ingredients and bake in a water bath (that is the trick for not having the top split), and let it cool.  I love cheesecake and have been known to eat it for breakfast!  Cream cheese is good for you.

So, hurrah for 2 cancer free years and here is to many, many more...and I'll celebrate them all with cheesecake.

Keto Cheesecake

Make sure all ingredients are room temperature. Set it all out the night before you are going to make it.

for crust:
1-1/2 cups almond flour
2 tsp. lemon peel
1/2 cup powdered swerve
1/4 cup melted butter

for cake:
3 pkg. full fat cream cheese (24 oz.)
1/4 cup butter
3/4 cup powdered Swerve, or other powdered sweetener of choice
3/4 cup sour cream
3 eggs
zest from one lemon
1 Tbsp. vanilla extract

Generously butter a 9" springform pan, line the bottom with parchment. Cover the bottom and up the sides of the pan with two sheets of aluminum foil, making sure water can't seep into the bottom of the pan.

Place a roasting pan, big enough to fit the springform pan into, in the oven.  Preheat oven to 300°F.

Mix almond flour, lemon peel, swerve and melted butter together in a small bowl.  Pour into prepared springform pan and press firmly to cover the entire bottom of the pan.

In a large mixing bowl, or your standing mixer, cream the cream cheese and butter until smooth (this is where everything must be room temperature or it doesn't mix and you get lumps, yech).  Add powdered sweetener and mix.  Add sour cream, mix, add eggs, one at a time, mixing well between each addition.  Add lemon zest and vanilla and mix again.  Pour into prepared springform pan and spread evenly over crust.

Place springform pan in roaster and fill roaster 2/3 up the side of the springform pan.  Bake for 60-80 minutes, until set and middle doesn't jiggle.  Remove from oven and remove springform pan from water.  Let cool about 10 minutes.  Using a small, sharp knife, run around the edge of the cheesecake to release it from the side.  Open the ring to ensure there is no sticking (this helps it not stick and crack as it cools), let cool for 60 minutes, then place in refrigerator for at least 3 hours.  Slice into 16 slices and serve with desired toppings.  Enjoy!

1 year ago:    Coconut Almond Chocolate Bars and Pepper Eating Dogs
3 years ago:   Hazard Lights and Coconut Banana Refresher Drink
5 years ago:   Banana Chocolate Chip Donuts

August 1, 2019  Sunrise 4:50 am  Sunset 11:01 pm  Temp. H65/ L 49°


Monday, July 15, 2019

Blueberries and Leaving the Freezer door open


Someone left the freezer door ajar, I'm not naming names (because it was probably me, but I'm trying to put the blame on my husband)  but it was open all night.

We have this turkey we are saving for the hippy boys birthday dinner. He has gotten into the habit of asking for Thanksgiving dinner for his birthday dinner so we get an extra Turkey in November and save it for his day. Then we have turkey and all the fixins' for his birthday because he says he is thankful for gravy (I also have 8 cups of turkey stock frozen so I can make turkey gravy).

Well, the turkey moved just enough to keep the door ajar (I think it was when Dave was returning my water bottles to the freezer from changing them from my ice pump for my foot). Everything in the freezer stayed frozen, albeit frosty now, but the items in the door did thaw. The door holds the last bit of last year's berries. The cranberries were fine, cold and they will refreeze, but the blueberries were a ziplock of liquid. There was nothing to do but make blueberry sauce and use it in something.

I make a basic sauce - 1/2 cup sugar (or non sugar sweetener of your choice) to every two cups of blueberries and a bit of fresh lemon juice - then I use it for many different things...pancakes, ice cream, cake topping, tarts...the list goes on. Today I was craving a cheesecake, so I made a creamy cheesecake and topped slices with it. The cheesecake was creamy and sweet and the blueberries were a tangy addition.

It is too bad that Dave can't eat dairy...I guess I'll just have to eat this whole cheesecake myself, well I guess I'll share with my mom and dad! 

Basic Blueberry Sauce
(Alaskan blueberries are more tart than commercial berries, so adjust the sugar to your liking)

4 cups blueberries
1 cup confectioners Swerve, or sweetener of choice
1 Tbsp. fresh lemon juice

Combine all ingredients, stirring to melt the sugar, and bring to a boil.  Boil 10-12 minutes or until reduced by about half.  Mixture will thicken as it cools.

1 year ago:    Prosciutto Wrapped Halibut with Roasted Tomato Cream
3 years ago:   Grapenut Bread for my Dad
5 years ago:   The Curly Haired Boy's Wedding

July 15, 2019  Sunrise 3:52 am  Sunset 11:58 pm  Temp. H 78/ L 56°F


Tuesday, April 30, 2019

Cheeseburger Casserole

I was hurrying out of the grocery store and rushing to my next errand, trying to get it all done during my lunch break.  I'm deep in thought as I scurry down the row of cars and stop short next to mine.

The driver side door is wide open.  Did I forget to shut the door?  I always lock my door by touching the outside lock button so I'm sure I don't lock my keys in the car.  Did I not shut the door and lock it?

I take two steps closer.

Shit!  Who ever broke into my car is still in the driver's seat.  Do I yell, do I walk up and demand they get out and leave my stuff alone?

The person sitting in the driver's seat has totally white hair, is a woman and about 85 years old.

Did she get confused when she saw I left my door open and sat down because she thought it was her car?  Is she hurt?

At this point I rush to the aid of the poor delusional elder.

Crap, I don't own a Jeep, I own an Escape...that isn't my car.

And it's Monday.
So I made this for dinner.   Bacon-Cheeseburger casserole is quick, easy and doesn't care what kind of car you drive or if you remembered to shut the door.  I just hope Tuesday goes a little smoother.
Lots of bacon is needed because someone (cough..Dave..cough)
keeps eating it off the top

I like mine with avocado and tomato, pass the ketchup.

Cheeseburger Casserole
4 slices bacon, diced
1/2 small onion, diced small
1 lb. ground beef, or moose
2 Tbsp. sugar free ketchup
1 Tbsp. mustard
2 cloves garlic, minced
2 Tbsp. cream cheese
1 cup grated cheddar or colby jack cheese

toppings:
avocado
tomatos
lettuce
red onion, diced

In a medium frying pan, over medium heat, fry bacon until crisp.  Remove from pan to a paper towel lined plate.  Leaving the fat in the pan, add onion and sauté until translucent, 3-5 minutes.  Add ground meat and cook, breaking up any large clumps.  When browned, add garlic and cook for 1 minute.  Add ketchup, mustard and cream cheese.  Stir until well mixed.  Top with grated cheese and either cover with a lid until cheese is melted or place under the broiler for a few minutes to melt the cheese.  Sprinkle bacon bits over top and serve with desired toppings.  Serves 4

1 year ago:    Chocolate-Cocnut No Bake Cookies and the Texting Fiasco
5 years ago:   Grilled Chicken with Mango and Jicama Salad
7 years ago:   Frog on a Lilly pad

April 30, 2019   Sunrise 5:21am  Sunset 10:17pm  Temp. H 66/ L 37°F